I just tried to use the Ansible htpasswd and it said:
msg: This module requires the passlib Python library
You just need to check that python-passlib is installed like so:
action: apt pkg=python-passlib state=latest install_recommends=yes
I just tried to use the Ansible htpasswd and it said:
msg: This module requires the passlib Python library
You just need to check that python-passlib is installed like so:
action: apt pkg=python-passlib state=latest install_recommends=yes
It’s a real pain to change the bitrate of Sound Juicer to actually make the MP3 or Ogg files good quality. For some reason the default quality is terrible and the developers have removed the menu which allows you to change the bitrate. Frankly, this makes Sound Juicer useless as a ripping tool and I believe that it should be removed from the Ubuntu repositories.
Basically, my advice is to uninstall Sound Juicer and install Asunder.
sudo apt-get remove sound-juicer
and
sudo apt-get install asunder
This will save you a world of pain and give you an easy to use piece of software.
Synology have released a Linux Cloud Station Client – which is brilliant news. Well done Synology for listening to your customers. It works really well and is quite easy to installed.
Step 1 – Download the Cloud Station Client for Linux from here. Note – there is a section for Linux so don’t download the Windows client.
http://www.synology.com/en-uk/support/download
Step 2 – Extract the download
tar -xvzf CloudStation-Linux-Installer-2572-64bit.tgz
Step 3 – Run the ./install file . Important – don’t run it as root! If you run the install script as root no menu icon will appears and the client will not run.
./install
The rest is quite simple – just follow the instructions that appear on the screen.
p.s. If you ever want to uninstall Cloud Station – here are quick guide.
I’m interested to see how well it works.
You need to set the permissions on the wp-content so that your webserver can write:
chown -R www-data:www-data wp-content chmod -R 755 wp-content
Then set the following configuration the your wp-config.php
define('FS_METHOD', 'direct');
sudo apt-get install update-manager-core
sudo do-release-upgrade -d
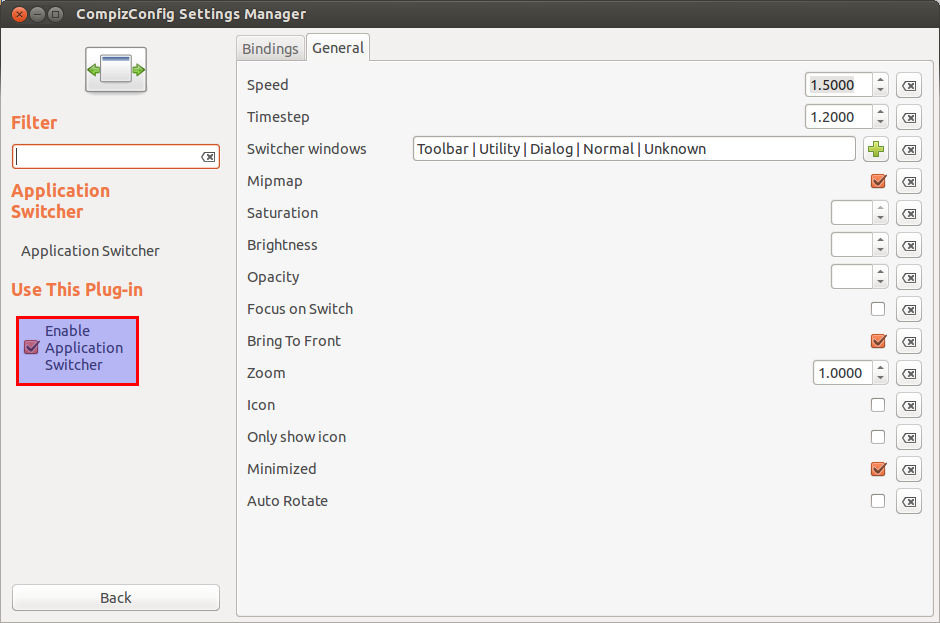
I’m a fan of Ubuntu Unity, however like all desktops there a few little niggles. I wanted to change the behavior of the Ubuntu Unity application switcher. The problem is that I have multiple terminals open and I want to be able to switch between them. However the alt-tab behaviour only allows you to switch between complete difference application. I.e. going between a terminal and Firefox is fine but you can’t switch between two terminals. Anyhow, here is the recipe that I found worked to change the alt-tab behaviour of Ubuntu.
1 – Install Compiz Config Settings Manager and the compiz-plugins-extra (which includes the old application switcher).
sudo apt-get install compizconfig-settings-manager compiz-plugins-extra
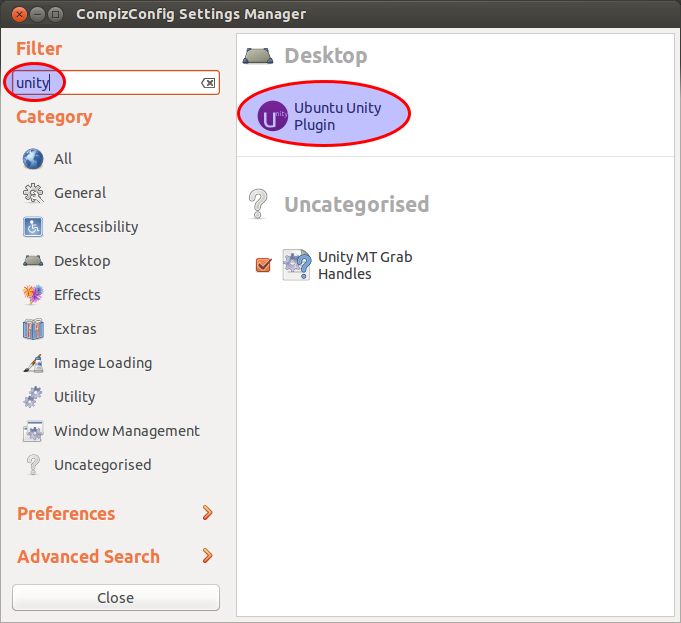
2 – Start Compiz Config Settings Manager and disable the Ubuntu Unity Switcher like so:
You can search for the Ubuntu Unity plugin in the top left hand corner.
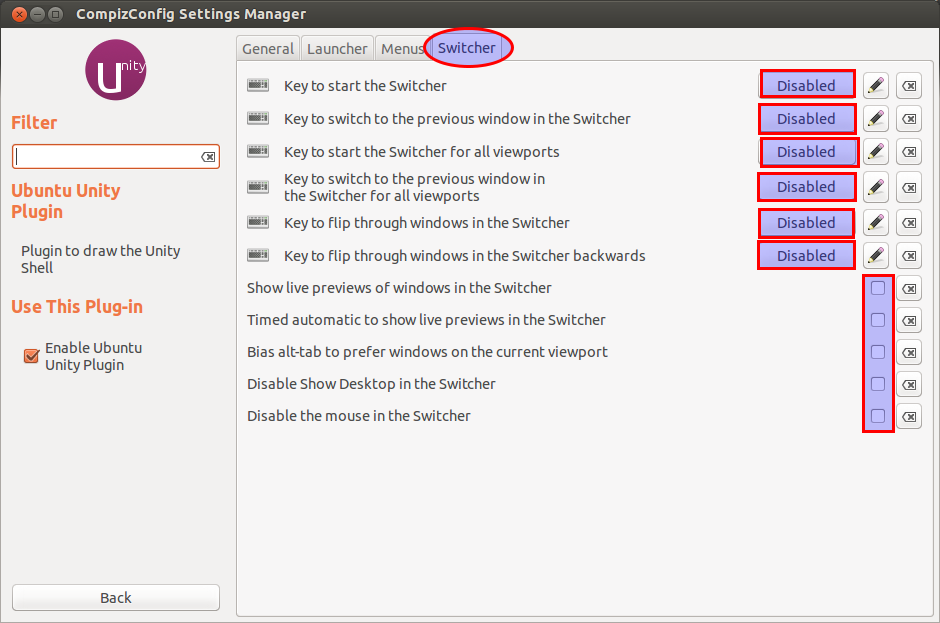
Select the switcher tab and this disable everything. If you don’t disable all the features then you can have a key binding conflict.
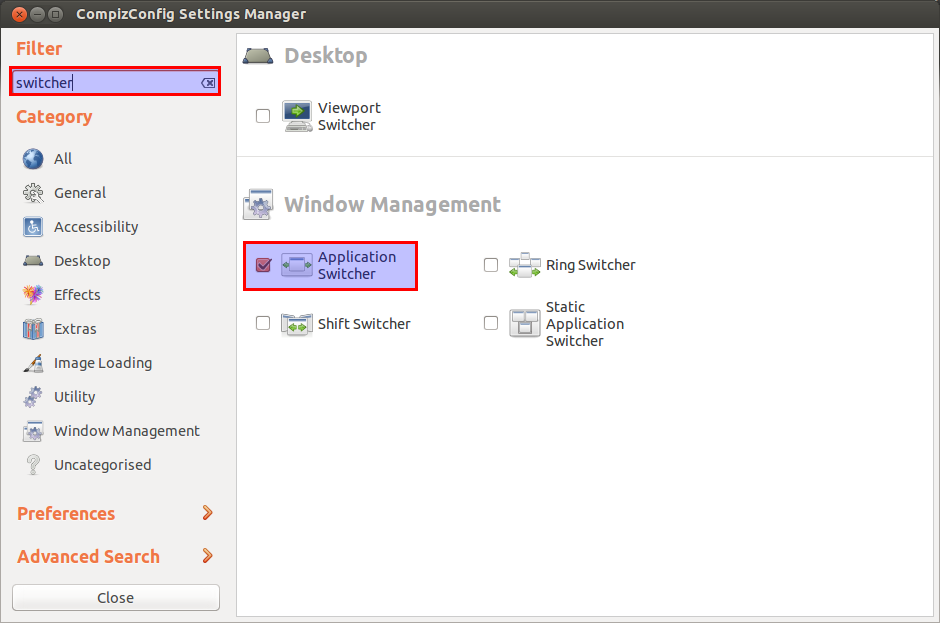
3 – Enable the old Compiz Switcher like so:
Search for the application switcher in the top left hand corner.
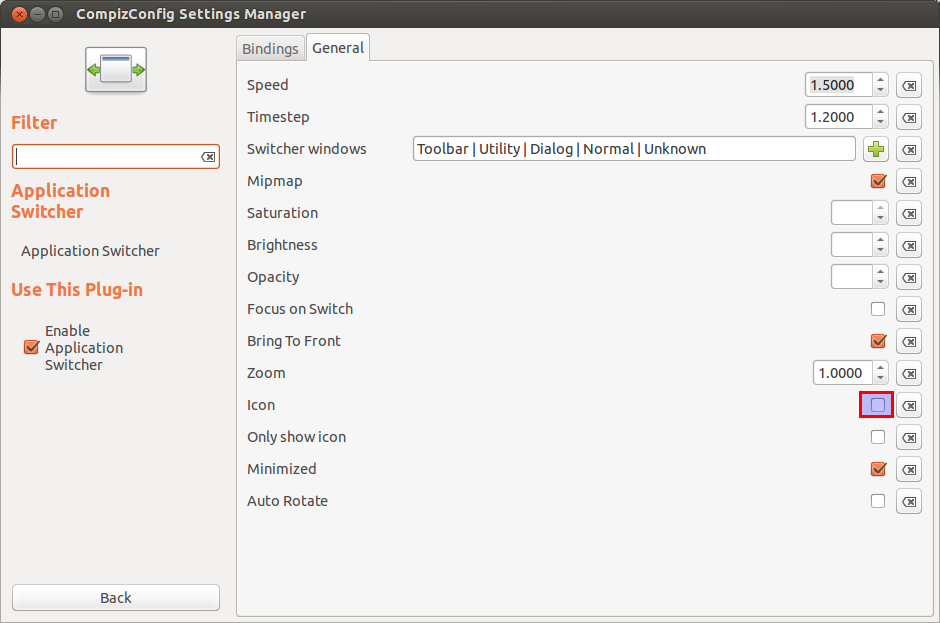
Uncheck the “icon” select box because otherwise you end up with a rather ugly icons which are massive.
Finally Enable the Applcation Switcher.
You should now have a happy switcher. Hurray! Let me know if you have any improvements to this recipe.
I’m just playing around with Python Twitter Tools but given that I am new to Python, I can’t work out to set it up.
Step 1: Download and unzip the files from: https://github.com/sixohsix/twitter
Step 3: Install python-pip on your computer which is a tool for installiing Python software:
apt-get install python-pip
Step 4: Browse the folder and run:
apt-get install twitter
Step 5: Then you are can just run
The software will then authenticate with Twitter. You just have to login and get the pin number for the application.
Enjoy.
To make changes to a HP raid array while the server is running you need to first install the HP PSP pack. Instructions for installing this are : located here. You then need to use the “HP Array Configuration Utility CLI” called hpacucli.
hpacucli
To show all raid array’s setup
==> ctrl slot=0 pd all show
I have a HP server with two raid arrays. To explain what is shown below: array A has two disks plus a spare and array B has four disks and no spare. Here is how it looks before I add the new disk.
Smart Array P410i in Slot 0 (Embedded) array A physicaldrive 1I:1:1 (port 1I:box 1:bay 1, SAS, 72 GB, OK) physicaldrive 1I:1:2 (port 1I:box 1:bay 2, SAS, 72 GB, OK) physicaldrive 1I:1:3 (port 1I:box 1:bay 3, SAS, 146 GB, OK, spare) array B physicaldrive 2I:1:5 (port 2I:box 1:bay 5, SATA, 1 TB, OK) physicaldrive 2I:1:6 (port 2I:box 1:bay 6, SATA, 1 TB, OK) physicaldrive 2I:1:7 (port 2I:box 1:bay 7, SATA, 1 TB, OK) physicaldrive 2I:1:8 (port 2I:box 1:bay 8, SATA, 1 TB, OK)
I then pop the drive in bay 4 and it looks like this – notice the unassigned disk:
Smart Array P410i in Slot 0 (Embedded) array A physicaldrive 1I:1:1 (port 1I:box 1:bay 1, SAS, 72 GB, OK) physicaldrive 1I:1:2 (port 1I:box 1:bay 2, SAS, 72 GB, OK) physicaldrive 1I:1:3 (port 1I:box 1:bay 3, SAS, 146 GB, OK, spare) array B physicaldrive 2I:1:5 (port 2I:box 1:bay 5, SATA, 1 TB, OK) physicaldrive 2I:1:6 (port 2I:box 1:bay 6, SATA, 1 TB, OK) physicaldrive 2I:1:7 (port 2I:box 1:bay 7, SATA, 1 TB, OK) physicaldrive 2I:1:8 (port 2I:box 1:bay 8, SATA, 1 TB, OK) unassigned physicaldrive 1I:1:4 (port 1I:box 1:bay 4, SATA, 1 TB, OK)
I want to add the unassigned disk to Array B as a spare. (Note: you can’t mix SAS and SATA disks in HP arrays). So enter the following command:
==> ctrl slot=0 array A add spares=allunassigned
And finally, I get this:
Smart Array P410i in Slot 0 (Embedded) array A physicaldrive 1I:1:1 (port 1I:box 1:bay 1, SAS, 72 GB, OK) physicaldrive 1I:1:2 (port 1I:box 1:bay 2, SAS, 72 GB, OK) physicaldrive 1I:1:3 (port 1I:box 1:bay 3, SAS, 146 GB, OK, spare) array B physicaldrive 2I:1:5 (port 2I:box 1:bay 5, SATA, 1 TB, OK) physicaldrive 2I:1:6 (port 2I:box 1:bay 6, SATA, 1 TB, OK) physicaldrive 2I:1:7 (port 2I:box 1:bay 7, SATA, 1 TB, OK) physicaldrive 2I:1:8 (port 2I:box 1:bay 8, SATA, 1 TB, OK) physicaldrive 1I:1:4 (port 1I:box 1:bay 4, SATA, 1 TB, OK, spare)
I hope this help. I also found this really good cheat sheet for doing this here: