How to ssh key with a passphrase but not have to enter it all the time.

Everyone knows that passwords aren’t always secure, annoying to remember and type. Add to that the longer/stronger your password the harder it is to remember. Therefore ssh-keys are very convenient and more secure. However, most people don’t put a passphrase on their ssh-keys because surely this would mean you would have to enter this passphrase every time you use the key and therefore remove the whole convenience of the key.

Ubuntu (and most versions of linux) come with a handy tool (ssh-agent) which can store your passphrase securely and enter it for you when you login. Essentially, this post really is a quick guide to using ssh-agent on Ubuntu.

Here are the commands you need.

1 – Generate a ssh-key

$ ssh-keygen
Generating public/private rsa key pair.
Enter file in which to save the key (/home/user/.ssh/id_rsa):
Enter passphrase (empty for no passphrase): [Type a passphrase]
Enter same passphrase again: [Type passphrase again]
........
.......

2 – Add the ssh-key to your ssh-agent!

$ ssh-add
Enter passphrase for /home/user/.ssh/id_rsa:
Identity added: /home/user/.ssh/id_rsa (/home/user/.ssh/id_rsa)

3 – Copy the ssh to your remote host

$ssh-copy-id user@remote.com
user@remote.com's password: 
.....

4 – Now ssh in… look no passphrase required!

$ ssh user@remote.com

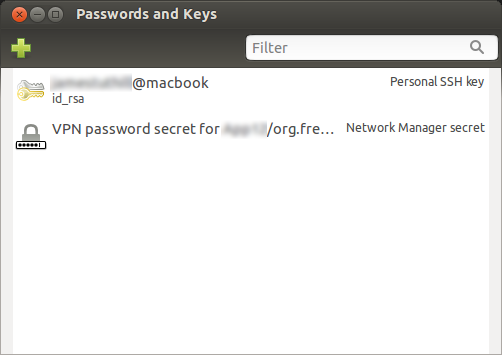
There are also a handy gui tool for adding and removing stored keys. It’s called Seahorse but you can find it by typing “passwords” or “keys” into dash search.

Managing SSH-KEY with GUI on Ubuntu

This is a screenshot of Seahorse on Ubuntu.

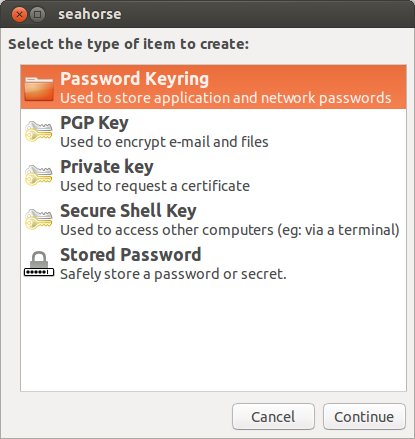
Adding a new ssh-key with seahorse on Ubuntu

Adding a new key using Seahorse.

Ansible error fatal: must be stored as a dictionary/hash

I’ve been trying to setup group_vars in Ansible. My /group_vars/all file looked like;

some_variable:"value"

When I ran my playbook it said:

Ansible error  "fatal: ...... must be stored as a dictionary/hash"

It would have been helpful if it had provided a better error message. Anyhow, basically, I had got the syntax wrong in group vars by putting “quotes” around the value:

some_variable: value 

Hope this helps someone.

How to install Balsamiq Mockups on Ubuntu 13.04

You can install Balsamiq Mockup on Linux / Ubuntu but Balasmiq don’t provide good instructions. I have no idea why they don’t spend a little time and write documentation properly. Anyhow, here is how I installed Balsamiq on my Ubuntu 13.04 laptop.

If you are looking for Instructions for installing Balsamuq Mockups for Ubuntu 13.10 – please visit this post

Step 1 – Download Adobe Airhttp://airdownload.adobe.com/air/lin/download/latest/AdobeAIRInstaller.bin.

wget http://airdownload.adobe.com/air/lin/download/latest/AdobeAIRInstaller.bin

Step 2: Make the installer excutable.

chmod +x AdobeAIRInstaller.bin

Step 3: Try running the installer.

sudo ./AdobeAIRInstaller.bin

Step 4: If your computer is 64bit then you will get this error:

"error while loading shared libraries: libgtk-x11-2.0.so.0: cannot open shared object file: No such file or directory"  

So, you will need to install the 32bit libs:

sudo apt-get install ia32-libs-gtk

Step 5: Try running the installer again

sudo ./AdobeAIRInstaller.bin

Step 6: You might get this error:

Sorry, an error has occurred. Adobe AIR could not be installed. Install either Gnome Keyring or KDE KWallet before installing Adobe AIR.

To fix this run the following command:

locate libgnome-keyring.so

I got (but you might get something different).

/usr/lib/x86_64-linux-gnu/libgnome-keyring.so.0
/usr/lib/x86_64-linux-gnu/libgnome-keyring.so.0.2.0

You will need to pass reference to these libs when running the installer.

sudo LD_LIBRARY_PATH=/usr/lib/x86_64-linux-gnu ./AdobeAIRInstaller.bin

If this works for you then goto Step 7. If this doesn’t work then you could make symbolic links to the libs. For 64bit:

sudo ln -s /usr/lib/x86_64-linux-gnu/libgnome-keyring.so.0 /usr/lib/libgnome-keyring.so.0
sudo ln -s /usr/lib/x86_64-linux-gnu/libgnome-keyring.so.0.2.0 /usr/lib/libgnome-keyring.so.0.2.0

For 32 bit:

sudo ln -s /usr/lib/i386-linux-gnu/libgnome-keyring.so.0 /usr/lib/libgnome-keyring.so.0
sudo ln -s /usr/lib/i386-linux-gnu/libgnome-keyring.so.0.2.0 /usr/lib/libgnome-keyring.so.0.2.0

Finally – try running the installer again.

sudo ./AdobeAIRInstaller.bin

Then remove the symbolic links:

sudo rm /usr/lib/libgnome-keyring.so.0
sudo rm /usr/lib/libgnome-keyring.so.0.2.0

Step 7 – Download Balsamiq

wget http://builds.balsamiq.com/b/mockups-desktop/MockupsForDesktop64bit.deb

Step 8 – Install Balasmiq

sudo dpkg -i MockupsForDesktop64bit.deb

Step 9 – Make a cup of tea and some mockups

PHP CURL SSL Not working Ubuntu 12.04

We have been trying to make a curl requested to login to a secure website from within PHP on Ubuntu 12.04. However, curl was hanging and responding with a nothing.

After much debugging, it turns out the curl was failing to negoitiate the correct ssl protocol to use. You can test if you have the same bug as follows. Open a terminal in Ubuntu

Try:

curl https://the.secure.website.com

If it fails then try setting the SSL version to 3.

curl -3 https://the.secure.website.com

If this goes then set the SSL version in your PHP script.

curl_setopt($ch, CURLOPT_SSLVERSION, 3);

Hope this helps someone.

Ansible vs Puppet – reasons for choosing Ansible

We have been using both Puppet and Ansible to configure our servers for several months. I have come to really love Ansible and I wanted to put down my reasons for finally choosing Ansible over Puppet.

Reason 1: Ansible is decentralised. With Puppet you need to maintain a central configuration server and install a Puppet Client (with root permissions) on each machine that you wish to configure. These individual client machines then connect to the configuration server and pull down their configurationa. Personally, as much as I love servers, I don’t want to maintain another server and client software. Ansible doesn’t require any central server. You just install and run it on your local machine. It doesn’t have any client software and configures the machines over ssh. This allows you to configure computers from anywhere, at anytime from any computer which has Ansible installed. This decentralised approach also means that Ansible once has done the configuration – it doesn’t sit there running in the background using power etc.

Reason 2: Ansible instantantly configures and provides feedback. . Puppet is based on a pull system which means the client ‘polls’ the server for changes to configurations. This means that there is a lag between writing a new configuration and having it pulled down to a server. For me this seem too complicated. Once I have written a configuration – I want to push it out immediately and check it worked.

Reason 3: Ansible configurations are ordered
Ansible is a little like a scripting language with commands running in a structured and ordered manner. Puppet on the other hand makes it hard to run ordered commands. It is possible by using dependencies. However, the simplicity of Ansible is, well, much simplier.

Reason 4: Ansible has a much gentler learning curve
It took me a much shorter period of time to learn Ansible compared to Puppet and achieve the same results. I’ve also found that it is much easier to explain Ansible to other people that I work with. For example – I’ve developed an Ansible script which configures a new development enviroment for an application that our team is working on. One of the members of the team saw the script in the repository and used it to configure his development enviroment with no prior knowledge of Ansible after 5 minutes of explaination from me. I’m sure that the reason for this is because Ansible script looks like other types of scripts and sysadmins and developers easierly understand scripts.

What are you thoughts?

How to install a list of packages with Ansible

I’ve been developing Ansible playbooks to help manage our Ubuntu servers. I wanted to install a list of package on a server using Ansible:

The old syntax:

 - name: Install list of packages
   action: apt pkg={{item}} state=installed
   with_items:
        - package1
        - package2
        - package3
        - etc

The new syntax:

 - name: Install list of packages
   apt: name={{item}} state=installed
   with_items:
        - package1
        - package2
        - package3
        - etc