How to send Apache error.log to debugchannel

DebugChannel.com is a great new service / downloadable server to help debug your web application. The key things are that it speeds up debugging because all your debug output can be clearly formatted and shown in the same place. So you can get debug information from php scripts or even apache error logs. This post shows you how to send your Apache error logs or even Apache access lots to a debugchannel server.

Step 1 – Download the debugchannel tail client called dctail. This small python script is a wrapper for the the Linux tail command to watch files and send them up a debugchannel server.

wget https://github.com/debugchannel/debugchannel-tail-client/archive/master.zip

Step 2 – Extract the download and run the installer script which will install the command in /usr/bin/local/dctail and also create a service script in /etc/init.d/. This allows you to run dctail as a service on Ubuntu.

unzip master.zip

You need to run the installer script as root.

sudo ./install.sh

Step 3 – Setup the configuration files. The installer script creates a configuration files in /etc/debugchannel/dctail.conf . This is a json files. The key things to specify are the debugchannel server and which files you want to watch. To watch an Apache error.log you might need want a configuration file like this:

{
    "address": "https://debugchannel.com",
    "apiKey": "someApiKey",
    "files": { "/var/log/apache/error.log":"apachelogs" }
}

Note: we are sending the /var/log/apache/error.log -> https://debugchannel.com/apachelogs

Step 4 – Start running dctail as root (because it need permissions to read the Apache error.logs. You can either run it once using:

sudo dctail

Or (in Ubuntu) as a service

sudo service dctail start

I hope this helps someone.
How to allow nginx to reverse proxy socket.io connections

We have just been setting up nginx as a reverse proxy for a node server. Everything worked fine except the socket.io connections weren’t making it through.

You make a reverse proxy with:

location / {
    proxy_pass http://localhost:1025/;
}

However to make nginx (version 1.3.13 +) reverse proxy socket.io you should add change your configuration to:

location / {
    proxy_pass http://localhost:1025/;
    proxy_http_version 1.1;
    proxy_set_header Upgrade $http_upgrade;
    proxy_set_header Connection "upgrade";
    proxy_set_header Host $host;
}

I learnt this from Chris Lea’s blog which is excellent. Also thank you Chris Lea for your excellent ppa’s.

How to change Ubuntu Unity window switcher back to old style…

I’m a fan of Ubuntu Unity, however like all desktops there a few little niggles. I wanted to change the behavior of the Ubuntu Unity application switcher. The problem is that I have multiple terminals open and I want to be able to switch between them. However the alt-tab behaviour only allows you to switch between complete difference application. I.e. going between a terminal and Firefox is fine but you can’t switch between two terminals. Anyhow, here is the recipe that I found worked to change the alt-tab behaviour of Ubuntu.

1 – Install Compiz Config Settings Manager and the compiz-plugins-extra (which includes the old application switcher).

sudo apt-get install compizconfig-settings-manager compiz-plugins-extra

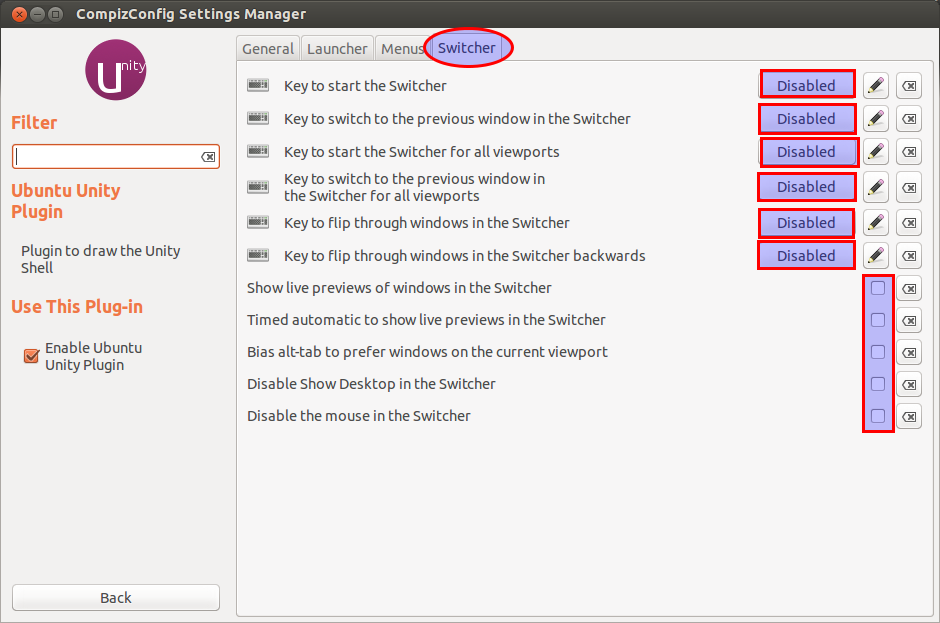
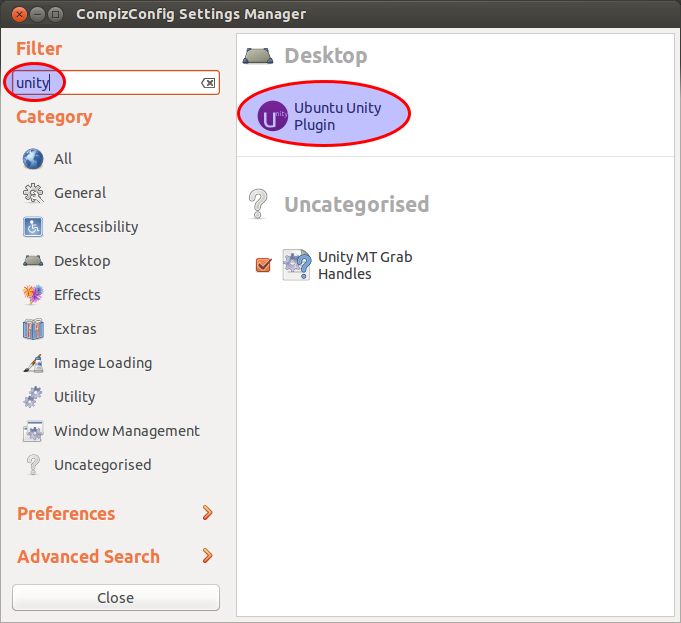
2 – Start Compiz Config Settings Manager and disable the Ubuntu Unity Switcher like so:

You can search for the Ubuntu Unity plugin in the top left hand corner.

Find the Ubuntu Unity Switcher

Select the switcher tab and this disable everything. If you don’t disable all the features then you can have a key binding conflict.

changing_the_behavior_of_ubuntu_unity_applicaiton_switcher_2

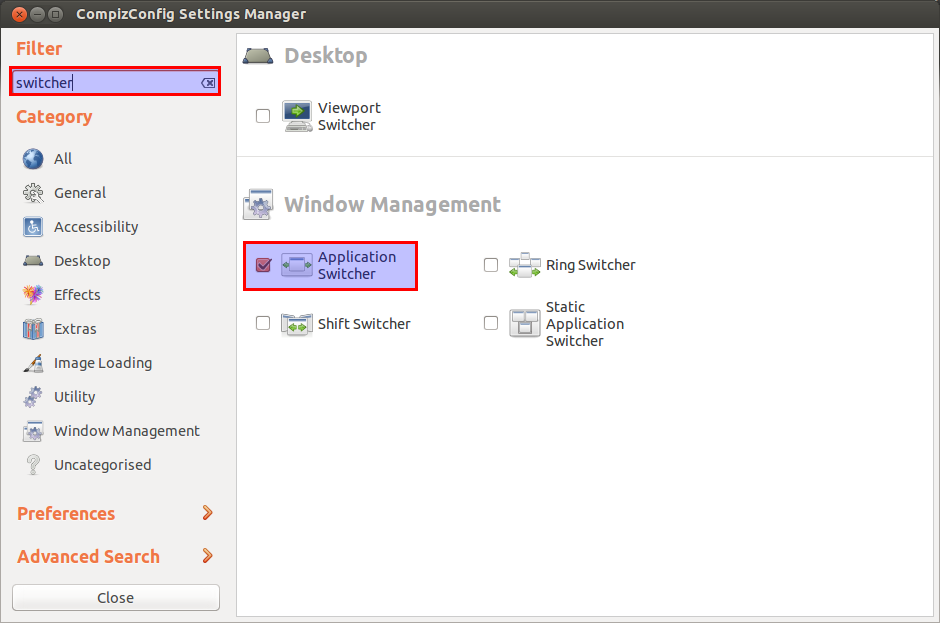
3 – Enable the old Compiz Switcher like so:

Search for the application switcher in the top left hand corner.

Search for the application switcher.

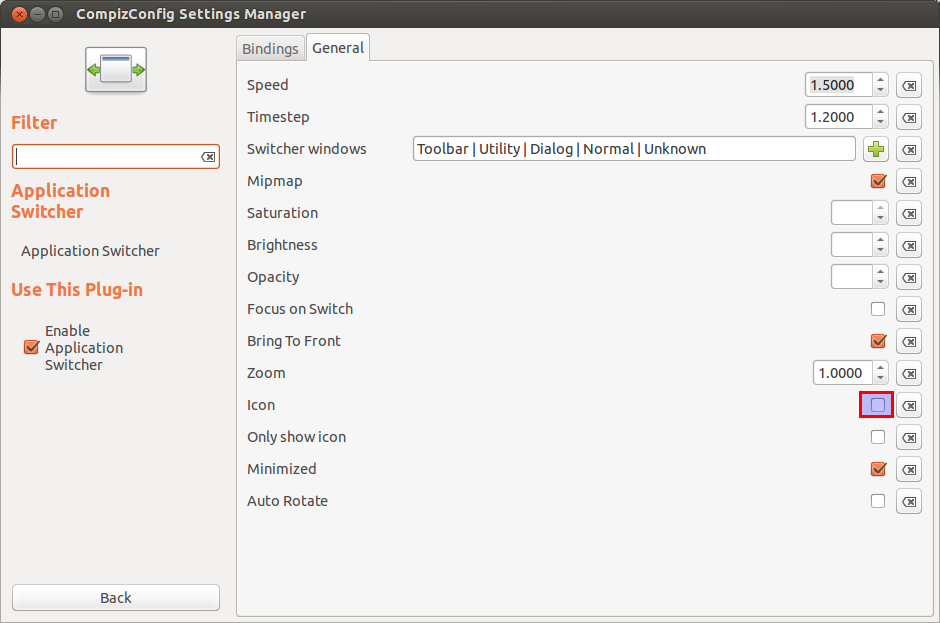
Uncheck the “icon” select box because otherwise you end up with a rather ugly icons which are massive.

changing_the_behavior_of_ubuntu_unity_applicaiton_switcher_4

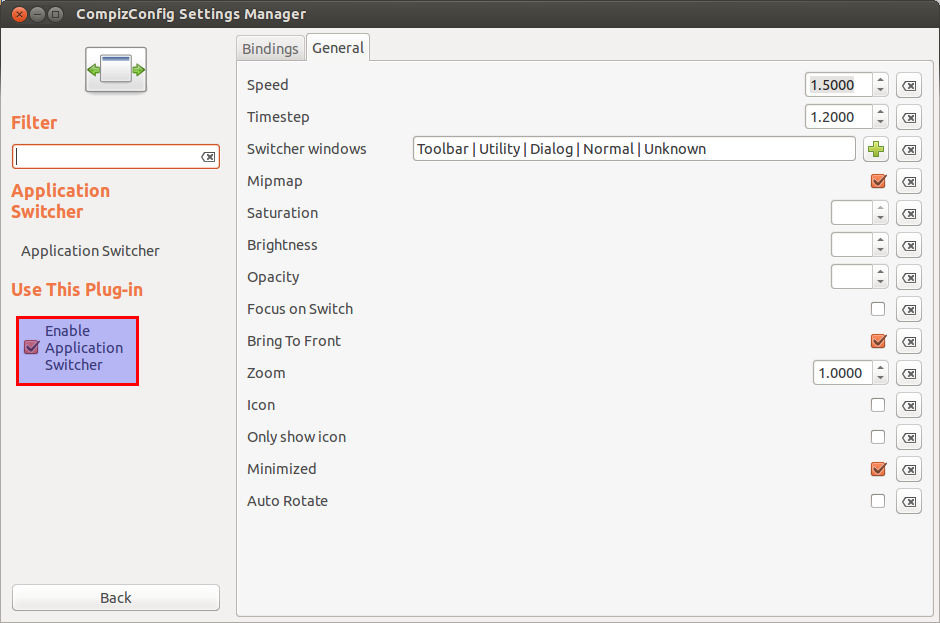
Finally Enable the Applcation Switcher.

enable_old_application_switcher.

You should now have a happy switcher. Hurray! Let me know if you have any improvements to this recipe.

How to setup Python Twitter Tools

I’m just playing around with Python Twitter Tools but given that I am new to Python, I can’t work out to set it up.

Step 1: Download and unzip the files from: https://github.com/sixohsix/twitter

Step 3: Install python-pip on your computer which is a tool for installiing Python software:

apt-get install python-pip

Step 4: Browse the folder and run:

apt-get install twitter

Step 5: Then you are can just run

twitter

The software will then authenticate with Twitter. You just have to login and get the pin number for the application.

Enjoy.

How to pipe Apache logs to a python script

I wanted to pipe the output of my Apache’s error logs to a Python script. To do this you need to set the a CustomLog directive in your Apache Config.

Edit /etc/apache2/sites-available/default and add the following line:

CustomLog "| /usr/bin/yourscript" combined

To read the input into Python you need to setup a non-blocking read from stdin.

#! /usr/bin/python
import sys
import select

while sys.stdin in select.select([sys.stdin], [], [], 0)[0]:
    line = sys.stdin.readline()

    if line:
        # Read a line
        exit()

    else:
        # End of file
        exit()
else:
    # Nothing to read
   exit()

Obviously, this script just exit’s at end point but you could put logic at each point to process the text as it is read, not read or eof by python.

Let me know if you have any improvements to this script.

How to assign a spare disk to raid array on a HP server on Ubuntu

To make changes to a HP raid array while the server is running you need to first install the HP PSP pack. Instructions for installing this are : located here. You then need to use the “HP Array Configuration Utility CLI” called hpacucli.

hpacucli

To show all raid array’s setup

==> ctrl slot=0 pd all show

I have a HP server with two raid arrays.  To explain what is shown below: array A has two disks plus a spare and array B has four disks and no spare. Here is how it looks before I add the new disk.

Smart Array P410i in Slot 0 (Embedded)

   array A

      physicaldrive 1I:1:1 (port 1I:box 1:bay 1, SAS, 72 GB, OK)
      physicaldrive 1I:1:2 (port 1I:box 1:bay 2, SAS, 72 GB, OK)
      physicaldrive 1I:1:3 (port 1I:box 1:bay 3, SAS, 146 GB, OK, spare)

   array B

      physicaldrive 2I:1:5 (port 2I:box 1:bay 5, SATA, 1 TB, OK)
      physicaldrive 2I:1:6 (port 2I:box 1:bay 6, SATA, 1 TB, OK)
      physicaldrive 2I:1:7 (port 2I:box 1:bay 7, SATA, 1 TB, OK)
      physicaldrive 2I:1:8 (port 2I:box 1:bay 8, SATA, 1 TB, OK)

I then pop the drive in bay 4 and it looks like this – notice the unassigned disk:

Smart Array P410i in Slot 0 (Embedded)

   array A

      physicaldrive 1I:1:1 (port 1I:box 1:bay 1, SAS, 72 GB, OK)
      physicaldrive 1I:1:2 (port 1I:box 1:bay 2, SAS, 72 GB, OK)
      physicaldrive 1I:1:3 (port 1I:box 1:bay 3, SAS, 146 GB, OK, spare)

   array B

      physicaldrive 2I:1:5 (port 2I:box 1:bay 5, SATA, 1 TB, OK)
      physicaldrive 2I:1:6 (port 2I:box 1:bay 6, SATA, 1 TB, OK)
      physicaldrive 2I:1:7 (port 2I:box 1:bay 7, SATA, 1 TB, OK)
      physicaldrive 2I:1:8 (port 2I:box 1:bay 8, SATA, 1 TB, OK)

   unassigned

      physicaldrive 1I:1:4 (port 1I:box 1:bay 4, SATA, 1 TB, OK)

I want to add the unassigned disk to Array B as a spare. (Note: you can’t mix SAS and SATA disks in HP arrays). So enter the following command:

==> ctrl slot=0 array A add spares=allunassigned

And finally, I get this:

Smart Array P410i in Slot 0 (Embedded)

   array A

      physicaldrive 1I:1:1 (port 1I:box 1:bay 1, SAS, 72 GB, OK)
      physicaldrive 1I:1:2 (port 1I:box 1:bay 2, SAS, 72 GB, OK)
      physicaldrive 1I:1:3 (port 1I:box 1:bay 3, SAS, 146 GB, OK, spare)

   array B

      physicaldrive 2I:1:5 (port 2I:box 1:bay 5, SATA, 1 TB, OK)
      physicaldrive 2I:1:6 (port 2I:box 1:bay 6, SATA, 1 TB, OK)
      physicaldrive 2I:1:7 (port 2I:box 1:bay 7, SATA, 1 TB, OK)
      physicaldrive 2I:1:8 (port 2I:box 1:bay 8, SATA, 1 TB, OK)
      physicaldrive 1I:1:4 (port 1I:box 1:bay 4, SATA, 1 TB, OK, spare)

I hope this help. I also found this really good cheat sheet for doing this here:

http://www.datadisk.co.uk/html_docs/redhat/hpacucli.htm

How to forward all root emails to your external email address Ubuntu?

If the root user is getting mail on your server (for example from cron scripts) then it can really helpful to forward it to an external email address. There are two ways of doing this:

1) The easiest and quickest way is to make a file in the folder called /root/.forward and place your email address in it. Note – this will work for any user.

2) Alternatively you can edit the /etc/aliases and add the following line:

root: me@myemail.com

Then run:

newaliases

Then restart postfix (assuming this is you mta).

service postfix restart

Either way you can then test your configuration but sending an email:

echo test | mail -s "test message" root

p.s. You can install the mail command for this test using apt-get install mailutils 🙂