How to extend / increase a Windows Partition on KVM QEMU VM

We have a Windows 7 VM running on Ubuntu KVM. I needed to give the Windows 7 machine more disk space. This turns out to be really easy (when you know how).

Step 1 – Shutdown the VM

virsh shutdown hostname

Step 2 – Increase the qcow2 image
Find the qcow2 file of the VM and take a backup (just in case).

cp hostname.qcow2 hostname.qcow2.backup
qemu-img resize hostname.qcow2 +100GB

Step 3 – Start the VM
Now start the VM.

virsh start hostname

Step 4 – Extend the partition in Window
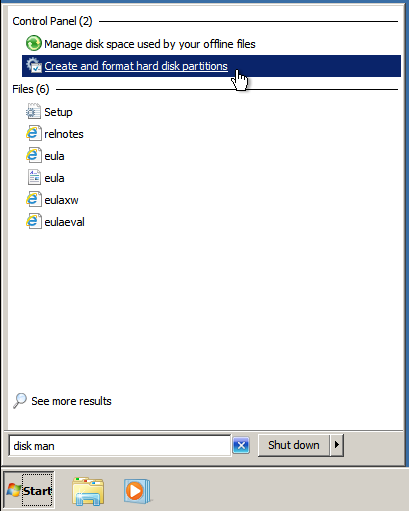
Windows has a really good partition management utility built into it. Search for “disk management”

window_7_vm_disk_resizing

Then select the partition, right click and choose extend partition. You should then follow the simple steps and you are done.

Let me know if you have any improvements to this.

Kernel does not support a non-PAE CPU install KVM guest on Ubuntu 13.10 – Fix

I just started to install an Ubuntu 13.10 KVM guest – however the build process failed. The command that I was using was:

vmbuilder kvm ubuntu -v --suite=saucy --libvirt=qemu:///system --arch=amd64  --cpus=1 --mem=2048 --swapsize=2048 --rootsize=220040 --flavour=virtual --hostname=mydomain --ip=1.2.3.4 --mask=1.2.3.4 --net=1.2.3.4 --bcast=1.2.3.4 --gw=1.2.3.4 --dns='8.8.8.8 8.8.4.4' --bridge=br0 --mirror=http://archive.ubuntu.com/ubuntu --components='main,universe' --addpkg=openssh-server --addpkg=acpid --addpkg=acpi-support --user=myuser --pass=mypassword --dest=/mnt/kvm/server/

However, I got this error message:

....
This kernel does not support a non-PAE CPU.
dpkg: error processing /var/cache/apt/archives/linux-image-3.8.0-32-generic_3.8.0-32.47_amd64.deb (--unpack):
 subprocess new pre-installation script returned error exit status 1
Examining /etc/kernel/postrm.d .
run-parts: executing /etc/kernel/postrm.d/initramfs-tools 3.8.0-32-generic /boot/vmlinuz-3.8.0-32-generic
run-parts: executing /etc/kernel/postrm.d/zz-update-grub 3.8.0-32-generic /boot/vmlinuz-3.8.0-32-generic
Errors were encountered while processing:
 /var/cache/apt/archives/linux-image-3.8.0-32-generic_3.8.0-32.47_amd64.deb
E: Sub-process /usr/bin/dpkg returned an error code (1)

Basically, you just need ensure the the linux-image-generic package (i.e. a kernel which supports non-PAE CPU’s) is installed by setting the addpkg flag like so:

--addpkg=linux-image-generic 

I hope this helps someone.

Networking disconnects with libvirt (kvm) and vm still running on Ubuntu

We’ve had a problem with some of our KVM Virtual machines where the network connection just disappears. The vm is still running but essentially it’s unreachable over the network (just like if you have pulled out the network cable of real computer). Until, I found the fix, I had to connect to the VM using VNC and then reboot it and everything works for a little while again. This happened on both Ubuntu 12.04 and 13.04 machines which and been completely updated.

I found it really hard to diagnose and searched endless for “kvm libvirt networking problem” or “kvm libvirt networking disappeared” or “kvm libvirt networking failure” etc.

However after trial and error, I found that the virtio virtual network driver was to blame. Changing it to the e1000 virtual network driver solved the problems.

So…

virsh edit vm-name

And change…

<interface type='bridge'>
    <mac address='xx:xx:xx:xx:xx:xx'/>
    <source bridge='br0'/>
    <model type='virtio'/>
    <address type='pci' domain='0x0000' bus='0x00' slot='0x03' function='0x0'/>
</interface>

to

<interface type='bridge'>
    <mac address='xx:xx:xx:xx:xx:xx'/>
    <source bridge='br0'/>
    <model type='e1000'/>
    <address type='pci' domain='0x0000' bus='0x00' slot='0x03' function='0x0'/>
</interface>

Hope this helps someone.

How to convert VirtualBox vdi to KVM qcow2

It is very easy to convert a VirtualBox .vdi disk images to KVM qcow2 file. You have to use the RAW file format as an intermediate.

1 – Make sure the VirtualBox machine is shutdown.

2 – Convert the vdi to a raw disk images. Note: vdi are compressed and raw images are not and so you will need to leave enough disk space for entire uncompressed disk.

VBoxManage clonehd --format RAW vm.vdi vm.img

3 – Then on your KVM host:

qemu-img convert -f raw vm.img -O qcow2 vm.qcow2

Hope this is helpful.

How to mount a qcow2 disk image on Ubuntu

This is a quick guide to mounting a qcow2 disk images on your host server. This is useful to reset passwords, edit files, or recover something without the virtual machine running.

Step 1 – Enable NBD on the Host
You will need to enable the nbd (network block device) kernel module on the host. This should be available on all Ubuntu servers after Intrepid.

sudo modprobe nbd max_part=8

Step 2- Connect the QCOW2 as network block device
Use qemu-nbd to connect your qcow2 file as a network block device. Note: You will need to specify the full path of qcow2 file even if you are the directory of the qcow files.

sudo qemu-nbd --connect=/dev/nbd0 /mnt/kvm/wordpress-sites.qcow2

Step 3 – Find The Virtual Machine Partitions
You can find a list of the partitions on the vm using the following command

sudo fdisk /dev/nbd0 -l

Step 4 – Mount the partition from the virtual machine.
For example, I want to mount partition 1 and therefore run:

 sudo mount /dev/nbd0p1 /mnt/somepoint/

Step 5 – Browse Your VM
You can then just browse the files in mnt/somepoint/

Afterwards unmount:

 sudo umount /mnt/somepoint/

Then disconnect the disk:

sudo qemu-nbd --disconnect /dev/nbd0

How to recover a qcow2 file using fsck

I just upgrade Ubuntu on one of my virtual machines and for some reason the file system was corrupted after I rebooted the server. I got errors like:

ext4-fs error ext4_lookup deleted inode referenced

Great. Here is how I fixed the problem.

I found the solution was to attach the qcow2 file as a device on the host and then use fsck. Obviously, you will need to shutdown the virtual machine before doing this.

On the host, enable the nbd (network block device) kernel module. This should be available on all Ubuntu servers after Intrepid.

sudo modprobe nbd max_part=8

You can this use qemu-nbd to connect your qcow2 file as a network block device.

sudo qemu-nbd --connect=/dev/nbd0 /mnt/kvm/wordpress-sites.qcow2

You can then find the partitions using

sudo fdisk /dev/nbd0

On the virtual machine, partition 1 was corrupted, so here is the command I ran:

sudo fsck /dev/nbd0p1

Then disconnect the disk:

sudo qemu-nbd --disconnect /dev/nbd0

Everything seemed to be fine and so I started the domain up again.

KVM: Host CPU does not provide required features

I just exported / copied a virtual machine from one of our servers (a HP Proliant) to my laptop so that I could to mess around with it offline. I used the following commands to export the domain.

On the server:

virsh dumpxml wordpress > /tmp/wordpress.xml

On the laptop:

virsh define wordpress.xml
virsh wordpress start

However, I got this error on the laptop:

error: unsupported configuration: guest and host CPU are not compatible: Host CPU does not provide required features: rdtscp, popcnt, sse4.2, dca

The HP server has xeon processors and my laptop has a little core two duo. Obviously the CPU’s had different capabilities. You can see the cpu definitions in the wordpress.xml file were:

less wordpress.xml
&lt;cpu match=&#39;exact&#39;&gt;
&nbsp;&nbsp;&nbsp;&nbsp;&lt;model&gt;Nehalem&lt;/model&gt;
&nbsp;&nbsp;&nbsp;&nbsp;&lt;vendor&gt;Intel&lt;/vendor&gt;
&nbsp;&nbsp;&nbsp;&nbsp;&lt;feature policy=&#39;require&#39; name=&#39;tm2&#39;/&gt;
&nbsp;&nbsp;&nbsp;&nbsp;&lt;feature policy=&#39;require&#39; name=&#39;est&#39;/&gt;
&nbsp;&nbsp;&nbsp;&nbsp;&lt;feature policy=&#39;require&#39; name=&#39;monitor&#39;/&gt;
&nbsp;&nbsp;&nbsp;&nbsp;&lt;feature policy=&#39;require&#39; name=&#39;ds&#39;/&gt;
&nbsp;&nbsp;&nbsp;&nbsp;&lt;feature policy=&#39;require&#39; name=&#39;ss&#39;/&gt;
&nbsp;&nbsp;&nbsp;&nbsp;&lt;feature policy=&#39;require&#39; name=&#39;vme&#39;/&gt;
&nbsp;&nbsp;&nbsp;&nbsp;&lt;feature policy=&#39;require&#39; name=&#39;rdtscp&#39;/&gt;
&nbsp;&nbsp;&nbsp;&nbsp;&lt;feature policy=&#39;require&#39; name=&#39;ht&#39;/&gt;
&nbsp;&nbsp;&nbsp;&nbsp;&lt;feature policy=&#39;require&#39; name=&#39;dca&#39;/&gt;
&nbsp;&nbsp;&nbsp;&nbsp;&lt;feature policy=&#39;require&#39; name=&#39;pbe&#39;/&gt;
&nbsp;&nbsp;&nbsp;&nbsp;&lt;feature policy=&#39;require&#39; name=&#39;tm&#39;/&gt;
&nbsp;&nbsp;&nbsp;&nbsp;&lt;feature policy=&#39;require&#39; name=&#39;vmx&#39;/&gt;
&nbsp;&nbsp;&nbsp;&nbsp;&lt;feature policy=&#39;require&#39; name=&#39;ds_cpl&#39;/&gt;
&nbsp;&nbsp;&nbsp;&nbsp;&lt;feature policy=&#39;require&#39; name=&#39;xtpr&#39;/&gt;
&nbsp;&nbsp;&nbsp;&nbsp;&lt;feature policy=&#39;require&#39; name=&#39;acpi&#39;/&gt;
&lt;/cpu&gt;

You can also view the same information using virsh capabilities command. It is worth piping it through less because the command produces alot of output and the host cpu information is at the top.

For the laptop:

virsh capabilities | less
&lt;cpu&gt;
&nbsp;&nbsp;&nbsp;&nbsp;&lt;arch&gt;x86_64&lt;/arch&gt;
&nbsp;&nbsp;&nbsp;&nbsp;&lt;model&gt;Penryn&lt;/model&gt;
&nbsp;&nbsp;&nbsp;&nbsp;&lt;vendor&gt;Intel&lt;/vendor&gt;
&nbsp;&nbsp;&nbsp;&nbsp;&lt;topology sockets=&#39;1&#39; cores=&#39;2&#39; threads=&#39;1&#39;/&gt;
&nbsp;&nbsp;&nbsp;&nbsp;&lt;feature name=&#39;pdcm&#39;/&gt;
&nbsp;&nbsp;&nbsp;&nbsp;&lt;feature name=&#39;xtpr&#39;/&gt;
&nbsp;&nbsp;&nbsp;&nbsp;&lt;feature name=&#39;tm2&#39;/&gt;
&nbsp;&nbsp;&nbsp;&nbsp;&lt;feature name=&#39;est&#39;/&gt;
&nbsp;&nbsp;&nbsp;&nbsp;&lt;feature name=&#39;smx&#39;/&gt;
&nbsp;&nbsp;&nbsp;&nbsp;&lt;feature name=&#39;vmx&#39;/&gt;
&nbsp;&nbsp;&nbsp;&nbsp;&lt;feature name=&#39;ds_cpl&#39;/&gt;
&nbsp;&nbsp;&nbsp;&nbsp;&lt;feature name=&#39;monitor&#39;/&gt;
&nbsp;&nbsp;&nbsp;&nbsp;&lt;feature name=&#39;dtes64&#39;/&gt;
&nbsp;&nbsp;&nbsp;&nbsp;&lt;feature name=&#39;pbe&#39;/&gt;
&nbsp;&nbsp;&nbsp;&nbsp;&lt;feature name=&#39;tm&#39;/&gt;
&nbsp;&nbsp;&nbsp;&nbsp;&lt;feature name=&#39;ht&#39;/&gt;
&nbsp;&nbsp;&nbsp;&nbsp;&lt;feature name=&#39;ss&#39;/&gt;
&nbsp;&nbsp;&nbsp;&nbsp;&lt;feature name=&#39;acpi&#39;/&gt;
&nbsp;&nbsp;&nbsp;&nbsp;&lt;feature name=&#39;ds&#39;/&gt;
&nbsp;&nbsp;&nbsp;&nbsp;&lt;feature name=&#39;vme&#39;/&gt;
&lt;/cpu&gt;

So, to fix the issue, I just edited the domains xml definition and put in the correct features.

virsh edit wordpress

Note – if you are using ubuntu on your desktop and have virt-manager installed (which is an awesome gui application which runs on Linux and Macs). You can run virt-manager, open the virtual machine, go to the information tab, select the processor and then “copy host cpu configuration”. I’ve attached a screenshot of how to do this.
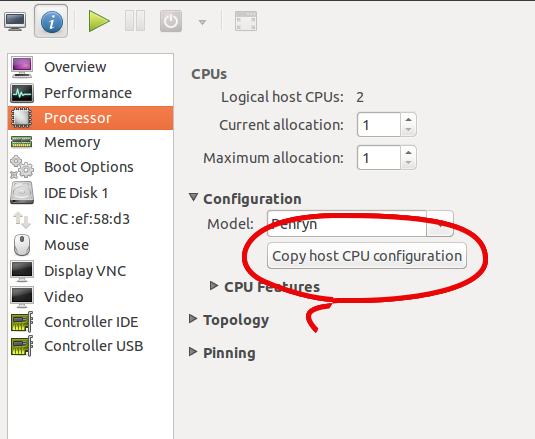
virt_manager_copy_configuration_from_host

I hope this helps someone.

Ubuntu 13.04 – kvm binary is deprecated?

I was trying to setup a KVM host with some KVM virtual machines on Ubuntu 13.04 Server.  It was a fresh install on a HP DL360.  However, there seemed to be a fundamental problem with KVM / virsh / virt-install.

When trying to install a virtual machine using virt-install with this command.

virt-install --accelerate -v -w bridge:br0 -m DE:AD:BE:EF:04:7B -n test1 --vcpus=2 -r 4096 --os-variant=ubuntuprecise --vnc --import --disk path=/home/me/vm.qcow2

I get this error:

ERROR internal error process exited while connecting to monitor: W: kvm binary is deprecated, please use qemu-system-x86_64 instead

It seems like a serious problem but it isn’t. I just should have put sudo in the front.

<strong>sudo</strong> virt-install --accelerate -v -w bridge:br0 -m DE:AD:BE:EF:04:7B -n test1 --vcpus=2 -r 4096 --os-variant=ubuntuprecise --vnc --import --disk path=/home/me/vm.qcow2

I hope this helps you because I wasted quite some time reading Ubuntu bug reports. Why can’t the system designers detect that the user didn’t have permissions and throw sensible errors?