Installing HP Proliant Support Pack (PSP) on Ubuntu 12.04

It took me a while to find the PSP for Ubuntu. It turns out that HP have renamed the old Proliant Support Pack to Management Component Pack.

We use HP ProLiant DL380 G6 servers and want to monitor the raid without using HP Insight software. You can either download the .deb files from the HP website:

However, it is much more convenient to add the HP Repository. Add the following to /etc/apt/sources.list:

deb http://downloads.linux.hp.com/SDR/downloads/MCP/ubuntu precise/current non-free

Download and add the repo keys to the system. The URL keeps changing and so there are a few choices before. The top on is the most likely to be the correct one.

wget http://downloads.linux.hpe.com/SDR/downloads/MCP/GPG-KEY-mcp
apt-key add GPG-KEY-mcp

or

wget http://downloads.linux.hp.com/SDR/downloads/MCP/GPG-KEY-mcp
apt-key add GPG-KEY-mcp

or

wget http://downloads.linux.hp.com/SDR/downloads/MCP/GPG-KEY-MCP
apt-key add GPG-KEY-MCP

Update apt-get:

apt-get update

If you want to monitor raid array then install hpacucli

apt-get install hpacucli

A basic report showing the status of your raid arrays is:

hpacucli ctrl all show config

An example output is:

Smart Array P410i in Slot 0 (Embedded)    (sn: 50123456789ABCDE)

   array A (SAS, Unused Space: 0  MB)

      logicaldrive 1 (273.4 GB, RAID 1+0, OK)

      physicaldrive 1I:1:1 (port 1I:box 1:bay 1, SAS, 146 GB, OK)
      physicaldrive 1I:1:2 (port 1I:box 1:bay 2, SAS, 146 GB, OK)
      physicaldrive 1I:1:3 (port 1I:box 1:bay 3, SAS, 146 GB, OK)
      physicaldrive 1I:1:4 (port 1I:box 1:bay 4, SAS, 146 GB, OK)

   array B (SATA, Unused Space: 0  MB)

      logicaldrive 2 (1.8 TB, RAID 1+0, OK)

      physicaldrive 2I:1:5 (port 2I:box 1:bay 5, SATA, 1 TB, OK)
      physicaldrive 2I:1:6 (port 2I:box 1:bay 6, SATA, 1 TB, OK)
      physicaldrive 2I:1:7 (port 2I:box 1:bay 7, SATA, 1 TB, OK)
      physicaldrive 2I:1:8 (port 2I:box 1:bay 8, SATA, 1 TB, OK)

   SEP (Vendor ID PMCSIERA, Model  SRC 8x6G) 250 (WWID: 50123456789ABCED)

Enjoy.
How to connect Ubuntu Client to Synology VPN server using PPTP

We have a Synology Rackstation NAS and it comes with a VPN server. I decided to try and work out how to connect my Ubuntu laptop to the Synology VPN server and route my network through that. It took me sometime to get the settings right, so I have put together a guide in the hope that it helps someone else.

Step 1 – Install the server
I installed the VPN server. You can find instruction on how to do this on the Synology website.

Step 2 – Configure the VPN server
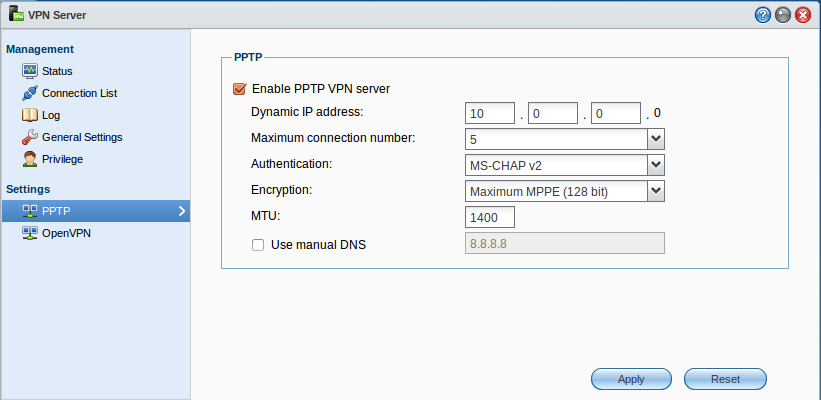
I configured the VPN server settings as follows:

Step 3 – Setup configure the Ubuntu client
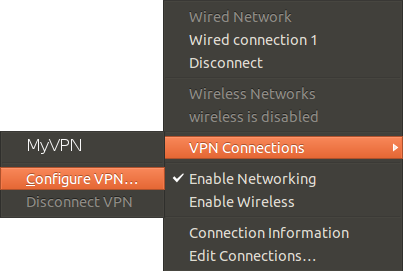
Now using the network manager and select VPN Connections -> Configure VPN…

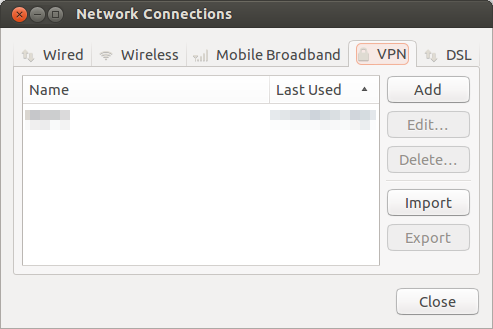
Then click the add button:

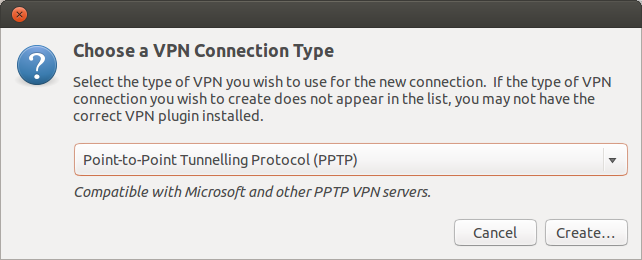
Select PPTP and click create:

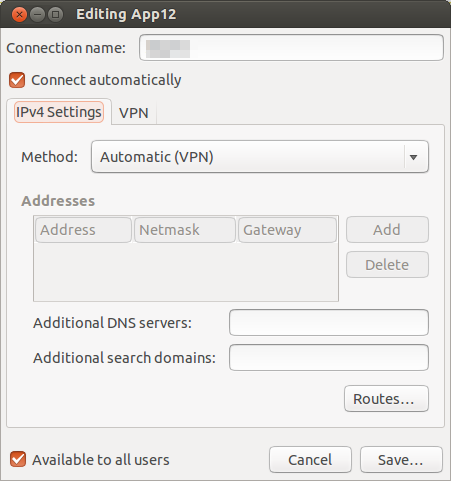
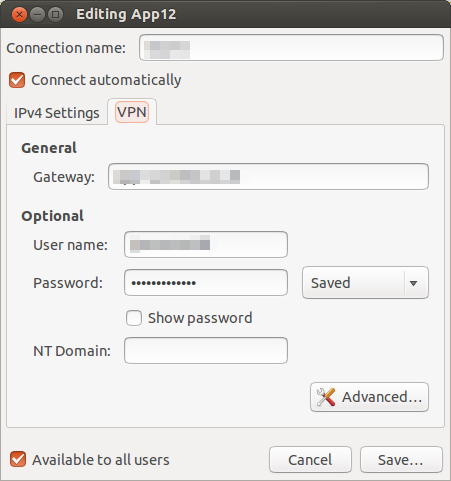
Don’t need to change the IPV4 settings – they should look like this:

You should name the connection, then enter the VPN server IP address or domain name. You will also need to add your username and password exactly the same as on the Synology server. Note: Don’t put anything in the NT Domain field. This isn’t required and will stop the client authenticating. Other how to suggest that you do this – it isn’t required for Synology.

Final Tweaks
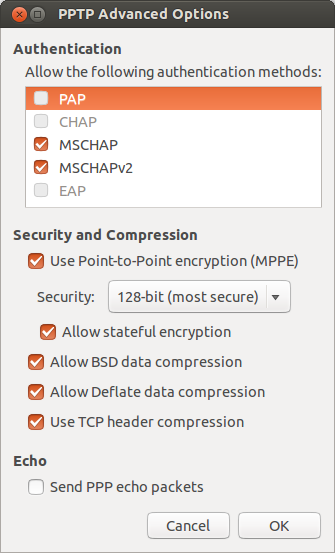
You can then tweak the advanced settings to make sure the client runs as securely as possible. Here are the settings that I used:

Enable Your VPN Connection
To enable your the VPN connection you should click on the Network Manager -> VPN Connections -> Select your VPN connection. You will know that the VPN connection is working when the network icon has a little padlock. You don’t need to reboot your computer to make this connection work.

If you have problems then I recommend tailing the /var/log/syslog to debug.

tail -f /var/log/syslog

I hope this helps. Let me know if you have any feedback.

How to route all your network traffic through an SSH Tunnel

I’ve recently been visiting China and have been caught out by their Firewall.  This hasn’t be too bad but Google Mail and Google Drive is really slow or intermittent.  Also you can’t access YouTube or the BBC IPlayer.   The final straw for me was for some reason they have blocked the Ubuntu Dropbox repository – so you can’t install Dropbox either.

I don’t have VPN account but we do have some servers.  Therefore, I decided to route all the network traffic through one of our server.

I tried various options and final settled on sshuttle because I needed to route everything and not just Firefox. Sshuttle is a transparent proxy server that forwards over a SSH connection and sets up a proxy by running Python scripts on the remote server.  I’m assuming your are running Ubuntu on both the client and the remote server.  You will need administrative privileges on the client.

sudo apt-get install sshuttle

To route all traffic through sshuttle (except DNS):

sshuttle -r username@sshserver:port 0/0

You will then need to enter your password on your client and then the password for the remote machine.  To help debug run sshuttle in verbose mode with the -v flag.  The -r flag is  the remote host (and username).   The port 0/0 is short for 0.0.0.0/0 that represents the subnets to route over the VPN.  The usage of 0/0 routes all the traffic except DNS requests to the remote server.  If you need to tunnel your DNS too then add the -H flag.

The project website is https://www.stunnel.org/index.html

Happy Tunnelling.