I just exported / copied a virtual machine from one of our servers (a HP Proliant) to my laptop so that I could to mess around with it offline. I used the following commands to export the domain.
On the server:
virsh dumpxml wordpress > /tmp/wordpress.xml
On the laptop:
virsh define wordpress.xml
virsh wordpress start
However, I got this error on the laptop:
error: unsupported configuration: guest and host CPU are not compatible: Host CPU does not provide required features: rdtscp, popcnt, sse4.2, dca
The HP server has xeon processors and my laptop has a little core two duo. Obviously the CPU’s had different capabilities. You can see the cpu definitions in the wordpress.xml file were:
less wordpress.xml
<cpu match='exact'>
    <model>Nehalem</model>
    <vendor>Intel</vendor>
    <feature policy='require' name='tm2'/>
    <feature policy='require' name='est'/>
    <feature policy='require' name='monitor'/>
    <feature policy='require' name='ds'/>
    <feature policy='require' name='ss'/>
    <feature policy='require' name='vme'/>
    <feature policy='require' name='rdtscp'/>
    <feature policy='require' name='ht'/>
    <feature policy='require' name='dca'/>
    <feature policy='require' name='pbe'/>
    <feature policy='require' name='tm'/>
    <feature policy='require' name='vmx'/>
    <feature policy='require' name='ds_cpl'/>
    <feature policy='require' name='xtpr'/>
    <feature policy='require' name='acpi'/>
</cpu>
You can also view the same information using virsh capabilities command. It is worth piping it through less because the command produces alot of output and the host cpu information is at the top.
For the laptop:
virsh capabilities | less
<cpu>
    <arch>x86_64</arch>
    <model>Penryn</model>
    <vendor>Intel</vendor>
    <topology sockets='1' cores='2' threads='1'/>
    <feature name='pdcm'/>
    <feature name='xtpr'/>
    <feature name='tm2'/>
    <feature name='est'/>
    <feature name='smx'/>
    <feature name='vmx'/>
    <feature name='ds_cpl'/>
    <feature name='monitor'/>
    <feature name='dtes64'/>
    <feature name='pbe'/>
    <feature name='tm'/>
    <feature name='ht'/>
    <feature name='ss'/>
    <feature name='acpi'/>
    <feature name='ds'/>
    <feature name='vme'/>
</cpu>
So, to fix the issue, I just edited the domains xml definition and put in the correct features.
virsh edit wordpress
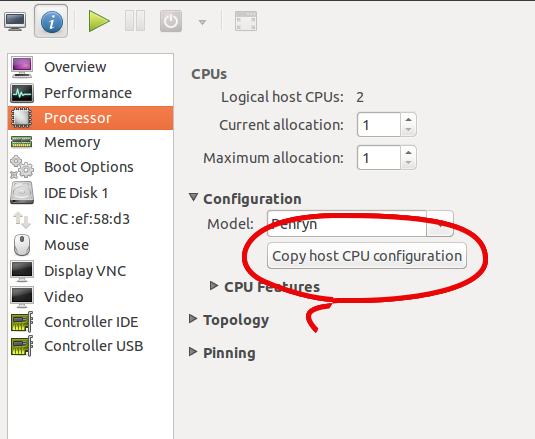
Note – if you are using ubuntu on your desktop and have virt-manager installed (which is an awesome gui application which runs on Linux and Macs). You can run virt-manager, open the virtual machine, go to the information tab, select the processor and then “copy host cpu configuration”. I’ve attached a screenshot of how to do this.

I hope this helps someone.
