Magento PDF Invoices not appearing…

…is that another bug with Magento? Surely not. Here is the apache error log:

Declaration of Zend_Pdf_FileParserDataSource_File::__construct() must be compatible with Zend_Pdf_FileParserDataSource::__construct() in /var/www/lib/Zend/Pdf/FileParserDataSource/File.php on line 41

The solution is to change the constructor function of lib/Zend/Pdf/FileParserDataSource.php

abstract public function __construct();

to

abstract public function __construct($filePath);

Again – this bug has been around since 2010. It’s 2012…

Magento php extensions 0 must be loaded

I’ve just been installing Magento (which for some reason is a real pain!). I got a really random error message when trying to setup the database. I get an error message just saying:

"php extensions 0 must be loaded"

You need to edit app/code/core/Mage/Install/etc/config.xml changing:

<extensions>
<pdo_mysql/>
</extensions>

to this:

<extensions>
<pdo_mysql>[code]1

</pdo_mysql>
</extensions>
[/code]

Given that this bug has been around since for about 3 years – surely Magento can fix it?

Installing HP Proliant Support Pack (PSP) on Ubuntu 12.04

It took me a while to find the PSP for Ubuntu. It turns out that HP have renamed the old Proliant Support Pack to Management Component Pack.

We use HP ProLiant DL380 G6 servers and want to monitor the raid without using HP Insight software. You can either download the .deb files from the HP website:

However, it is much more convenient to add the HP Repository. Add the following to /etc/apt/sources.list:

deb http://downloads.linux.hp.com/SDR/downloads/MCP/ubuntu precise/current non-free

Download and add the repo keys to the system. The URL keeps changing and so there are a few choices before. The top on is the most likely to be the correct one.

wget http://downloads.linux.hpe.com/SDR/downloads/MCP/GPG-KEY-mcp
apt-key add GPG-KEY-mcp

or

wget http://downloads.linux.hp.com/SDR/downloads/MCP/GPG-KEY-mcp
apt-key add GPG-KEY-mcp

or

wget http://downloads.linux.hp.com/SDR/downloads/MCP/GPG-KEY-MCP
apt-key add GPG-KEY-MCP

Update apt-get:

apt-get update

If you want to monitor raid array then install hpacucli

apt-get install hpacucli

A basic report showing the status of your raid arrays is:

hpacucli ctrl all show config

An example output is:

Smart Array P410i in Slot 0 (Embedded)    (sn: 50123456789ABCDE)

   array A (SAS, Unused Space: 0  MB)

      logicaldrive 1 (273.4 GB, RAID 1+0, OK)

      physicaldrive 1I:1:1 (port 1I:box 1:bay 1, SAS, 146 GB, OK)
      physicaldrive 1I:1:2 (port 1I:box 1:bay 2, SAS, 146 GB, OK)
      physicaldrive 1I:1:3 (port 1I:box 1:bay 3, SAS, 146 GB, OK)
      physicaldrive 1I:1:4 (port 1I:box 1:bay 4, SAS, 146 GB, OK)

   array B (SATA, Unused Space: 0  MB)

      logicaldrive 2 (1.8 TB, RAID 1+0, OK)

      physicaldrive 2I:1:5 (port 2I:box 1:bay 5, SATA, 1 TB, OK)
      physicaldrive 2I:1:6 (port 2I:box 1:bay 6, SATA, 1 TB, OK)
      physicaldrive 2I:1:7 (port 2I:box 1:bay 7, SATA, 1 TB, OK)
      physicaldrive 2I:1:8 (port 2I:box 1:bay 8, SATA, 1 TB, OK)

   SEP (Vendor ID PMCSIERA, Model  SRC 8x6G) 250 (WWID: 50123456789ABCED)

Enjoy.

How to connect Ubuntu Client to Synology VPN server using PPTP

We have a Synology Rackstation NAS and it comes with a VPN server. I decided to try and work out how to connect my Ubuntu laptop to the Synology VPN server and route my network through that. It took me sometime to get the settings right, so I have put together a guide in the hope that it helps someone else.

Step 1 – Install the server
I installed the VPN server. You can find instruction on how to do this on the Synology website.

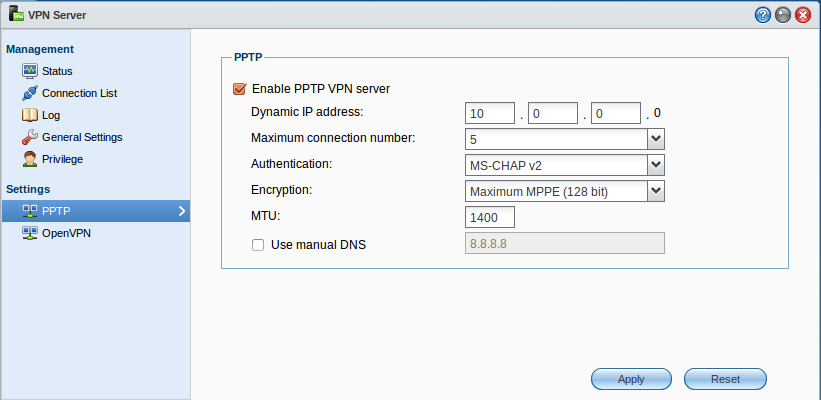
Step 2 – Configure the VPN server
I configured the VPN server settings as follows:

Step 3 – Setup configure the Ubuntu client
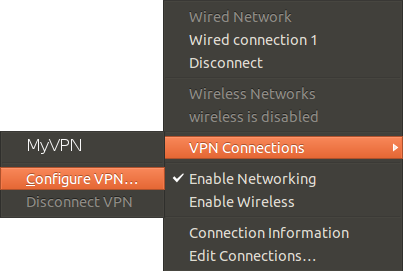
Now using the network manager and select VPN Connections -> Configure VPN…

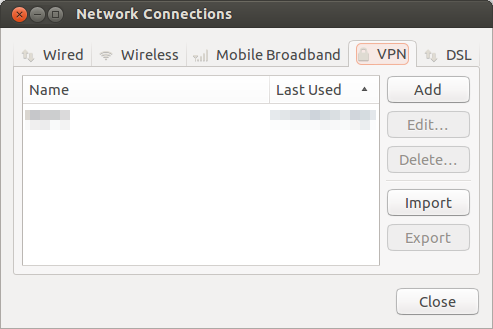
Then click the add button:

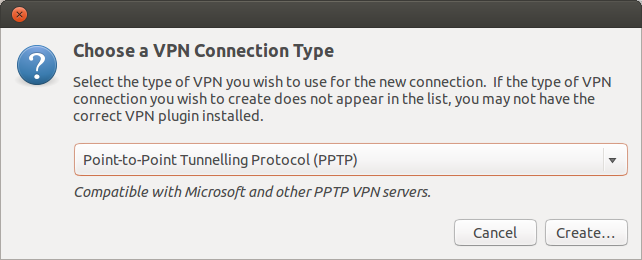
Select PPTP and click create:

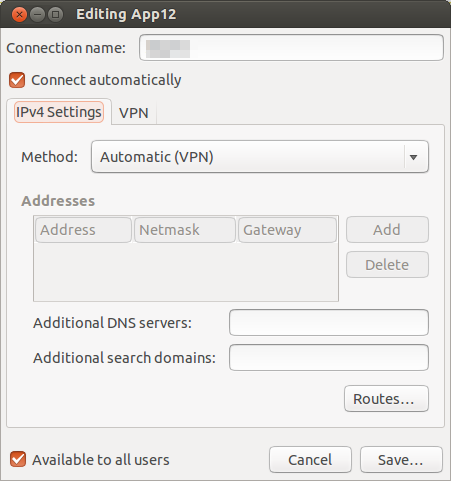
Don’t need to change the IPV4 settings – they should look like this:

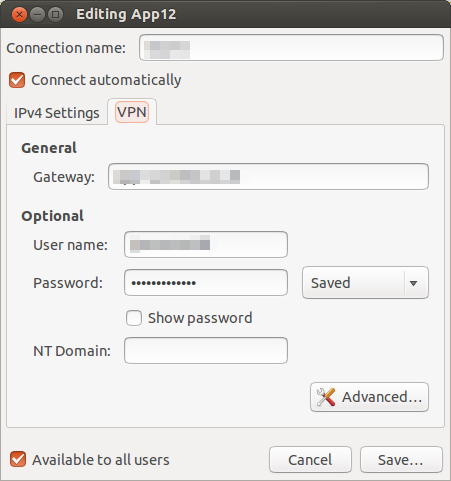
You should name the connection, then enter the VPN server IP address or domain name. You will also need to add your username and password exactly the same as on the Synology server. Note: Don’t put anything in the NT Domain field. This isn’t required and will stop the client authenticating. Other how to suggest that you do this – it isn’t required for Synology.

Final Tweaks
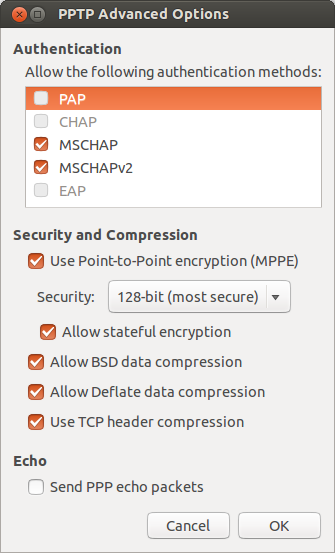
You can then tweak the advanced settings to make sure the client runs as securely as possible. Here are the settings that I used:

Enable Your VPN Connection
To enable your the VPN connection you should click on the Network Manager -> VPN Connections -> Select your VPN connection. You will know that the VPN connection is working when the network icon has a little padlock. You don’t need to reboot your computer to make this connection work.

If you have problems then I recommend tailing the /var/log/syslog to debug.

tail -f /var/log/syslog

I hope this helps. Let me know if you have any feedback.

How to route all your network traffic through an SSH Tunnel

I’ve recently been visiting China and have been caught out by their Firewall.  This hasn’t be too bad but Google Mail and Google Drive is really slow or intermittent.  Also you can’t access YouTube or the BBC IPlayer.   The final straw for me was for some reason they have blocked the Ubuntu Dropbox repository – so you can’t install Dropbox either.

I don’t have VPN account but we do have some servers.  Therefore, I decided to route all the network traffic through one of our server.

I tried various options and final settled on sshuttle because I needed to route everything and not just Firefox. Sshuttle is a transparent proxy server that forwards over a SSH connection and sets up a proxy by running Python scripts on the remote server.  I’m assuming your are running Ubuntu on both the client and the remote server.  You will need administrative privileges on the client.

sudo apt-get install sshuttle

To route all traffic through sshuttle (except DNS):

sshuttle -r username@sshserver:port 0/0

You will then need to enter your password on your client and then the password for the remote machine.  To help debug run sshuttle in verbose mode with the -v flag.  The -r flag is  the remote host (and username).   The port 0/0 is short for 0.0.0.0/0 that represents the subnets to route over the VPN.  The usage of 0/0 routes all the traffic except DNS requests to the remote server.  If you need to tunnel your DNS too then add the -H flag.

The project website is https://www.stunnel.org/index.html

Happy Tunnelling.

smbfs stops working after upgrading from ubuntu 12.04 to 12.10

Just has another little problem while upgrading from Ubuntu 12.04 to Ubuntu 12.10.  It seems that smbfs no longers works in Ubuntu 12.10.  Once again, why don’t the developers make a webpage or a popup application which tells you these changes?  It would save hours of time for lots of users.

Anyhow, here is how I converted my fstab to work.  Before it looked like this:

//server/share /mnt/server/share smbfs iocharset=utf8,credentials=/path/to/.smbcredentials,uid=1000,gid=1000

Afterwards, I changed smbfs -> cifs and remove the gid.

//server/share /mnt/server/share cifs iocharset=utf8,credentials=/path/to/.smbcredentials,uid=1000 0 0

If you have problems then tail the /var/log/kern.log

tail -f /var/log/kern.log

Great. Back up an running again.

Unity freezing after upgrade from Ubuntu 12.04 to 12.10

I just upgraded my desktop from Ubuntu 12.04 to 12.10.   Everything looked good until I tried to launch an application – then Unity frooze.  I thought it might be nvidia driver issues and tried:

apt-get remove nvidia-current;
apt-get install nvidia-current-updates;
reboot;

However, this didn’t fixed the problem.  After some searching around it appears that reseting Unity to default fixed the issue.  I wish the developers would make an upgrade script which checks that the Unity settings are okay (Firefox does this after an upgrade). Anyhow, here is how to reset Unity to its defaults.   You can either:

unity --reset

Or you can use this script which manages the process for you:  It is hosted on bitbucket at https://github.com/phanimahesh/unity-revamp  .  However, I installed it from the PPA:

sudo add-apt-repository ppa:amith/ubuntutools
sudo apt-get update
sudo apt-get install unity-reset
unity-reset

I used the script and it worked really well.  Hurray.

How to setup a KVM on Ubuntu

KVM (Kernel Virtual Machine) is a brilliant visualization software.  Over the last few years, I have installed quite a few hosts and have been keeping notes – so I thought that I would put them up on this blog.

Install Packages
Firstly, you need to install the basic Ubuntu packages.  I use ubuntu-vm-builder which automates most of the tasks.  The command to install everything you need is:

sudo apt-get install qemu-kvm libvirt-bin ubuntu-vm-builder bridge-utils

Out of interest, KVM doesn’t have it’s own configuration directory. You’ll find the configuration files in:

/etc/libvirt/qemu/

Add Networking Bridge Adaptor
To give your virtual machines access to the network and you need to create a bridge on the host server.  You have already installed bridge-utils – so you just need to edit the network configuration in /etc/network/interfaces file.  If you make a mistake here and restart the networking the server will loose it’s network connection and you will have to use servers virtual console or actually terminal on the server – if it worth double checking everything.  Here is the configuration that I use:

auto br0
iface br0 inet static
address *.*.*.*
netmask *.*.*.*
network *.*.*.*
broadcast *.*.*.*
gateway *.*.*.*
dns-nameservers *.*.*.* *.*.*.*
bridge_ports eth0
bridge_fd 9
bridge_hello 2
bridge_maxage 12
bridge_maxwait 0

If you have installed a firewall on the host server (I always use UFW because it’s so easy to use) then you will need to relax the firewall to allow connections for the bridge adaptor.  To do this add the following line to /etc/ufw/before.rules, before COMMIT:

# allow bridge networking
-I FORWARD -m physdev –physdev-is-bridged -j ACCEPT

Installing a New Virtual Machine
To install a new VM you need to use vmbuilder. There are many, many, many options to vmbuilder. To view them all type vmbuilder –help.  The command I use to create the vm’s is shown below.  Obviously adjust everything to suit.

vmbuilder kvm ubuntu -v
–suite=precise
–libvirt=qemu:///system
–arch=amd64 –cpus=1 –mem=1024 –swapsize=4096 –rootsize=204800
–flavour=virtual
–hostname=hostname.co.uk
–ip=*.*.*.*
–mask=*.*.*.*
–net=*.*.*.*
–bcast=*.*.*.*
–gw=*.*.*.*
–dns=’8.8.8.8 8.8.4.4′
–bridge=br0
–mirror=http://archive.ubuntu.com/ubuntu –components=’main,universe’
–addpkg=openssh-server
–addpkg=acpid
–addpkg=acpi-support
–addpkg=linux-image-generic
–user=user
–pass=password
–dest=/somefolder/

Your guest will be built.  This will take some time as the host server has to connect to the Internet and download Ubuntu and install from there.  Once it is complete, if you selected to install the openssh-server package you can SSH into the guest and continue your set up from there.

Starting and Stopping the Guest
After installation you will need to start the VM.  To start and stop the guest you need to use Virsh (which you have already installed).  You can start the Virsh console by typing virsh. Alternatively you can type commands after virsh at the bash shell and it will execute the commands and return to the shell.

To see the list of currently running guests:

virsh list

To start your guest type:

virsh start hostname

To stop a guest it is recommended to connect (via SSH or other) to the guest and use the guest OS’ shutdown command. If that is not possible you can try send the machine an ACPI shutdown command using:

virsh shutdown hostname

In order for Ubuntu VM’s to respond to ACPI shutdown request they need to have acpid and acpi-support packages installed.  If you followed the instructions above when creating the VM, this will have already been installed.   However, you can install them on the VM by running:

sudo apt-get install acpid acpi-support

If the guest doesn’t have ACPI enabled or doesn’t want to respond you can forcefully shutdown the machine by using the destroy command.  This has to be the most worryingly named command – but don’t worry it only forcefully stops the VM.  You run it by issuing:

virsh destroy hostname

If the guest hostname is not recognised, stop and restart the libvirt-bin service using:

sudo service libvirt-bin stop
sudo service libvirt-bin start

For reasons unknown it is not sufficient to simply restart the service, it has to be stopped and started. Fortunately the running VMs do not shutdown when stopping the libvirt-bin service.