How keep multiple Ubuntu servers up to date

Once you have over three Ubuntu servers or desktops to manage it can be really useful to have a tool to help keep all their packages up to date. Put simply, you can’t keep logging into to each computer, checking and installing updates manually. I am not talking about configuring Ubuntu in the first place (you would do this is Ansible / Puppet etc). I’m just talking about installing periodic package upgrades.

For me the specific technical requirements of this tool would be:

  • The ability to see the state of all servers on one screen
  • Granular control to upgrade a single or multiple servers at once.
  • Granular control to upgrade a single or multiple or all packages at once

The general user / business requirements would be:

  • A simple easy to use piece of software with fast learning curve.
  • Good security protocols.
  • Good value for money.
  • Well maintained
  • Open source (optional)

I did some research, I found and tested following tools:

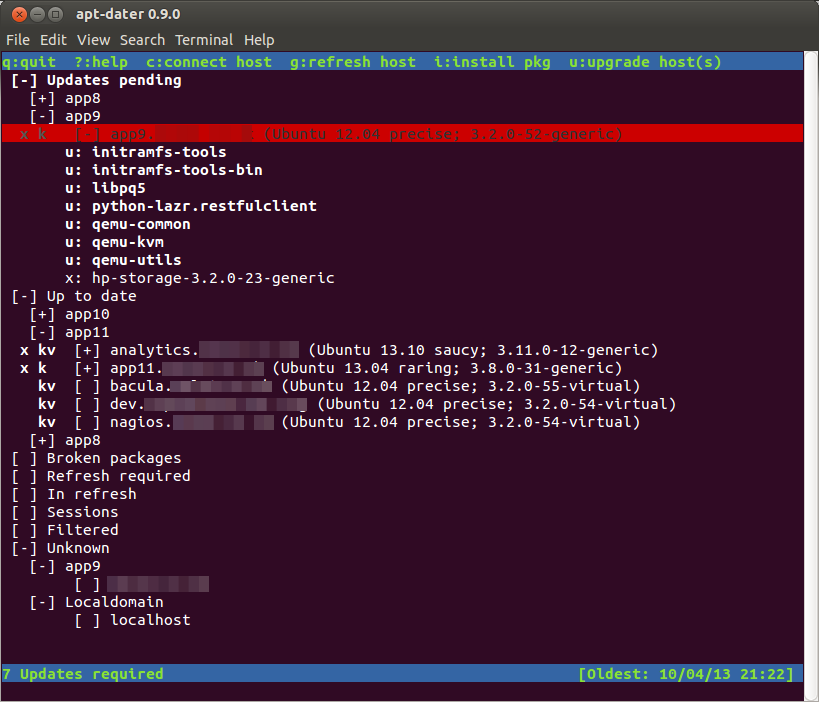
  • apt-dater – This is my preferred solution. Apt-Dater is an easy to use command line tool. The command line apperance is actually an advantage over a web based system because you can actually ssh into the computer directly from apt-dater itself. I.e. you can can see the packages being installed and then ssh in to fix any issues if they occur. It is very easy to configure.
  • using-apt-dater-to-kept-multiple-server-update

  • Ubuntu Landscape – This is a paid for, closed source, hosted service run by Cannonical and is design specifically for Ubuntu. It was the only tool I found with a web interface and coming with lots of additional features like monitoring. To test it, I signed up and used it for a year on two servers. It was really easy to use and met all my technical requirements. However it has one major problem… frankly it was poor value for money. The problem stems from the fact that you can only purchase the server management tools as part of a complete support package called Ubuntu Advantage. I generally don’t need support just the tools and a manual. However, when I tested the support they let me down. It was a lot slower and provided lower quality solutions than simply using a combination of Google and AskUbuntu. At the time of writing, it cost £201.68 per server. I have around 18 servers + 6 desktops and so if I rolled it out to all servers it would cost £4,015.24 per year. I normally think of IT investment over a 5 year period and would have spent over £20,000 in this time. This isn’t outragous for support but it is if you just want Landscape. Therefore, I could invest a little more time finding an alternative.
  • Puppet / Chef / Ansible etc – Using a server configuration tool might be another approach. You can configure these configuration tools to update the packages to the latest versions. However, once your server setup becomes more complex, it is impractical to completely automate the upgrading of packages. What if you don’t want MySQL upgrade as soon it hits the repositories? What happens if the kernel is upgraded? I feel it is a good idea to look at the upgrades before they are implemented and I don’t think that you can acheive this using these configuration tools.
  • cront-apt/apticron – Obviously, you could use a simple cron script to automatically upgrade the servers at say 3am every day. However, like configuration tools, I feel you need to look at the upgrades before they are implemented.

How to convert VirtualBox vdi to KVM qcow2

It is very easy to convert a VirtualBox .vdi disk images to KVM qcow2 file. You have to use the RAW file format as an intermediate.

1 – Make sure the VirtualBox machine is shutdown.

2 – Convert the vdi to a raw disk images. Note: vdi are compressed and raw images are not and so you will need to leave enough disk space for entire uncompressed disk.

VBoxManage clonehd --format RAW vm.vdi vm.img

3 – Then on your KVM host:

qemu-img convert -f raw vm.img -O qcow2 vm.qcow2

Hope this is helpful.

How to mount a qcow2 disk image on Ubuntu

This is a quick guide to mounting a qcow2 disk images on your host server. This is useful to reset passwords, edit files, or recover something without the virtual machine running.

Step 1 – Enable NBD on the Host
You will need to enable the nbd (network block device) kernel module on the host. This should be available on all Ubuntu servers after Intrepid.

sudo modprobe nbd max_part=8

Step 2- Connect the QCOW2 as network block device
Use qemu-nbd to connect your qcow2 file as a network block device. Note: You will need to specify the full path of qcow2 file even if you are the directory of the qcow files.

sudo qemu-nbd --connect=/dev/nbd0 /mnt/kvm/wordpress-sites.qcow2

Step 3 – Find The Virtual Machine Partitions
You can find a list of the partitions on the vm using the following command

sudo fdisk /dev/nbd0 -l

Step 4 – Mount the partition from the virtual machine.
For example, I want to mount partition 1 and therefore run:

 sudo mount /dev/nbd0p1 /mnt/somepoint/

Step 5 – Browse Your VM
You can then just browse the files in mnt/somepoint/

Afterwards unmount:

 sudo umount /mnt/somepoint/

Then disconnect the disk:

sudo qemu-nbd --disconnect /dev/nbd0

How to ssh key with a passphrase but not have to enter it all the time.

Everyone knows that passwords aren’t always secure, annoying to remember and type. Add to that the longer/stronger your password the harder it is to remember. Therefore ssh-keys are very convenient and more secure. However, most people don’t put a passphrase on their ssh-keys because surely this would mean you would have to enter this passphrase every time you use the key and therefore remove the whole convenience of the key.

Ubuntu (and most versions of linux) come with a handy tool (ssh-agent) which can store your passphrase securely and enter it for you when you login. Essentially, this post really is a quick guide to using ssh-agent on Ubuntu.

Here are the commands you need.

1 – Generate a ssh-key

$ ssh-keygen
Generating public/private rsa key pair.
Enter file in which to save the key (/home/user/.ssh/id_rsa):
Enter passphrase (empty for no passphrase): [Type a passphrase]
Enter same passphrase again: [Type passphrase again]
........
.......

2 – Add the ssh-key to your ssh-agent!

$ ssh-add
Enter passphrase for /home/user/.ssh/id_rsa:
Identity added: /home/user/.ssh/id_rsa (/home/user/.ssh/id_rsa)

3 – Copy the ssh to your remote host

$ssh-copy-id user@remote.com
user@remote.com's password: 
.....

4 – Now ssh in… look no passphrase required!

$ ssh user@remote.com

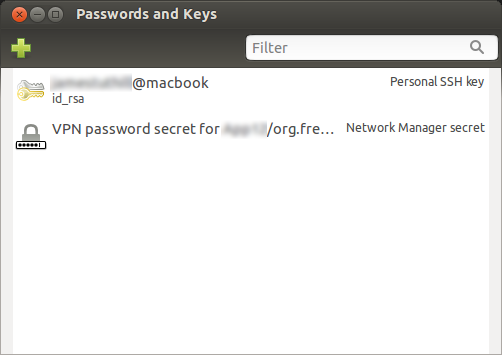
There are also a handy gui tool for adding and removing stored keys. It’s called Seahorse but you can find it by typing “passwords” or “keys” into dash search.

Managing SSH-KEY with GUI on Ubuntu

This is a screenshot of Seahorse on Ubuntu.

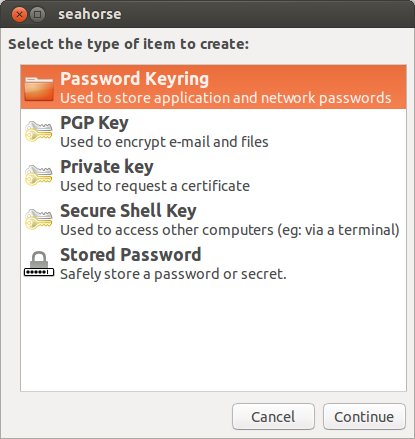
Adding a new ssh-key with seahorse on Ubuntu

Adding a new key using Seahorse.

Ansible error fatal: must be stored as a dictionary/hash

I’ve been trying to setup group_vars in Ansible. My /group_vars/all file looked like;

some_variable:"value"

When I ran my playbook it said:

Ansible error  "fatal: ...... must be stored as a dictionary/hash"

It would have been helpful if it had provided a better error message. Anyhow, basically, I had got the syntax wrong in group vars by putting “quotes” around the value:

some_variable: value 

Hope this helps someone.

How to install Balsamiq Mockups on Ubuntu 13.04

You can install Balsamiq Mockup on Linux / Ubuntu but Balasmiq don’t provide good instructions. I have no idea why they don’t spend a little time and write documentation properly. Anyhow, here is how I installed Balsamiq on my Ubuntu 13.04 laptop.

If you are looking for Instructions for installing Balsamuq Mockups for Ubuntu 13.10 – please visit this post

Step 1 – Download Adobe Airhttp://airdownload.adobe.com/air/lin/download/latest/AdobeAIRInstaller.bin.

wget http://airdownload.adobe.com/air/lin/download/latest/AdobeAIRInstaller.bin

Step 2: Make the installer excutable.

chmod +x AdobeAIRInstaller.bin

Step 3: Try running the installer.

sudo ./AdobeAIRInstaller.bin

Step 4: If your computer is 64bit then you will get this error:

"error while loading shared libraries: libgtk-x11-2.0.so.0: cannot open shared object file: No such file or directory"  

So, you will need to install the 32bit libs:

sudo apt-get install ia32-libs-gtk

Step 5: Try running the installer again

sudo ./AdobeAIRInstaller.bin

Step 6: You might get this error:

Sorry, an error has occurred. Adobe AIR could not be installed. Install either Gnome Keyring or KDE KWallet before installing Adobe AIR.

To fix this run the following command:

locate libgnome-keyring.so

I got (but you might get something different).

/usr/lib/x86_64-linux-gnu/libgnome-keyring.so.0
/usr/lib/x86_64-linux-gnu/libgnome-keyring.so.0.2.0

You will need to pass reference to these libs when running the installer.

sudo LD_LIBRARY_PATH=/usr/lib/x86_64-linux-gnu ./AdobeAIRInstaller.bin

If this works for you then goto Step 7. If this doesn’t work then you could make symbolic links to the libs. For 64bit:

sudo ln -s /usr/lib/x86_64-linux-gnu/libgnome-keyring.so.0 /usr/lib/libgnome-keyring.so.0
sudo ln -s /usr/lib/x86_64-linux-gnu/libgnome-keyring.so.0.2.0 /usr/lib/libgnome-keyring.so.0.2.0

For 32 bit:

sudo ln -s /usr/lib/i386-linux-gnu/libgnome-keyring.so.0 /usr/lib/libgnome-keyring.so.0
sudo ln -s /usr/lib/i386-linux-gnu/libgnome-keyring.so.0.2.0 /usr/lib/libgnome-keyring.so.0.2.0

Finally – try running the installer again.

sudo ./AdobeAIRInstaller.bin

Then remove the symbolic links:

sudo rm /usr/lib/libgnome-keyring.so.0
sudo rm /usr/lib/libgnome-keyring.so.0.2.0

Step 7 – Download Balsamiq

wget http://builds.balsamiq.com/b/mockups-desktop/MockupsForDesktop64bit.deb

Step 8 – Install Balasmiq

sudo dpkg -i MockupsForDesktop64bit.deb

Step 9 – Make a cup of tea and some mockups
PHP CURL SSL Not working Ubuntu 12.04

We have been trying to make a curl requested to login to a secure website from within PHP on Ubuntu 12.04. However, curl was hanging and responding with a nothing.

After much debugging, it turns out the curl was failing to negoitiate the correct ssl protocol to use. You can test if you have the same bug as follows. Open a terminal in Ubuntu

Try:

curl https://the.secure.website.com

If it fails then try setting the SSL version to 3.

curl -3 https://the.secure.website.com

If this goes then set the SSL version in your PHP script.

curl_setopt($ch, CURLOPT_SSLVERSION, 3);

Hope this helps someone.

Ansible vs Puppet – reasons for choosing Ansible

We have been using both Puppet and Ansible to configure our servers for several months. I have come to really love Ansible and I wanted to put down my reasons for finally choosing Ansible over Puppet.

Reason 1: Ansible is decentralised. With Puppet you need to maintain a central configuration server and install a Puppet Client (with root permissions) on each machine that you wish to configure. These individual client machines then connect to the configuration server and pull down their configurationa. Personally, as much as I love servers, I don’t want to maintain another server and client software. Ansible doesn’t require any central server. You just install and run it on your local machine. It doesn’t have any client software and configures the machines over ssh. This allows you to configure computers from anywhere, at anytime from any computer which has Ansible installed. This decentralised approach also means that Ansible once has done the configuration – it doesn’t sit there running in the background using power etc.

Reason 2: Ansible instantantly configures and provides feedback. . Puppet is based on a pull system which means the client ‘polls’ the server for changes to configurations. This means that there is a lag between writing a new configuration and having it pulled down to a server. For me this seem too complicated. Once I have written a configuration – I want to push it out immediately and check it worked.

Reason 3: Ansible configurations are ordered
Ansible is a little like a scripting language with commands running in a structured and ordered manner. Puppet on the other hand makes it hard to run ordered commands. It is possible by using dependencies. However, the simplicity of Ansible is, well, much simplier.

Reason 4: Ansible has a much gentler learning curve
It took me a much shorter period of time to learn Ansible compared to Puppet and achieve the same results. I’ve also found that it is much easier to explain Ansible to other people that I work with. For example – I’ve developed an Ansible script which configures a new development enviroment for an application that our team is working on. One of the members of the team saw the script in the repository and used it to configure his development enviroment with no prior knowledge of Ansible after 5 minutes of explaination from me. I’m sure that the reason for this is because Ansible script looks like other types of scripts and sysadmins and developers easierly understand scripts.

What are you thoughts?