Boot partition full of old kernels

I started getting an error message every time I booted into Ubuntu.  “‘The volume “boot” has only ….. bytes disk space remaining.”.   This is caused by old Linux kernels filling up the boot partition on the hard drive.  For most users, you don’t need to keep old kernels and therefore you can remove them to free up some space.   For simplicity sake – it did this using the Synaptic Package Manager.  Here is how:

1) First, you need to find the current kernel that you are was using – so that you don’t remove it!  Open a terminal and type:

uname -a

Linux toshiba 3.5.0-23-generic #35-Ubuntu SMP Thu Jan 24 13:05:29 UTC 2013 i686 i686 i686 GNU/Linux

2) From the output, I was using 3.5.0-23-generic.  Therefore, I could remove all other kernels with version numbers lower than this.   There are three packages that make up the kernel:

  • linux-header-x-x-x-x-generic
  • linux-image-x-x-x-x-generic
  • linux-image-extra-x-x-x-x-generic

Using Synaptic Package Manager search for linux-header, then linux-image and select  the ones with a lower version number than your current kernel.  Mark each package for removal.  The linux-image-extra will automatically be removed when you remove a linux-image.

Then apply the changes and reboot your machine.

p.s. – it strikes me that it would be really good if Ubuntu could automatically do this.  Perhaps this could be built into the automatic update tool.
 

How to connect Ubuntu Client to Synology VPN server using PPTP

We have a Synology Rackstation NAS and it comes with a VPN server. I decided to try and work out how to connect my Ubuntu laptop to the Synology VPN server and route my network through that. It took me sometime to get the settings right, so I have put together a guide in the hope that it helps someone else.

Step 1 – Install the server
I installed the VPN server. You can find instruction on how to do this on the Synology website.

Step 2 – Configure the VPN server
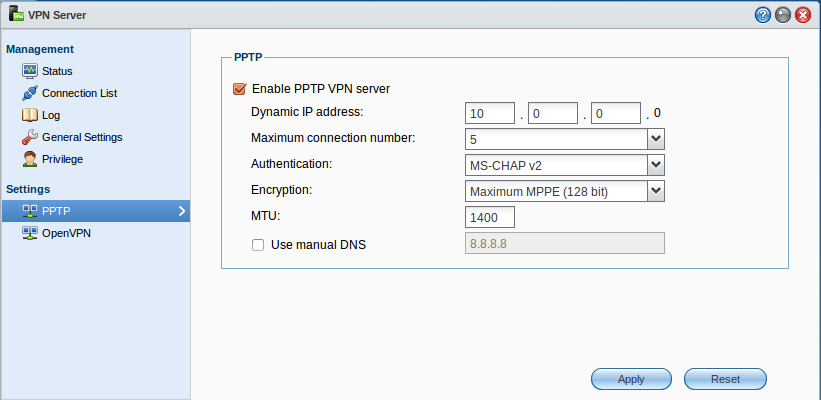
I configured the VPN server settings as follows:

Step 3 – Setup configure the Ubuntu client
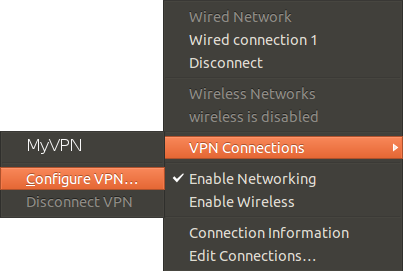
Now using the network manager and select VPN Connections -> Configure VPN…

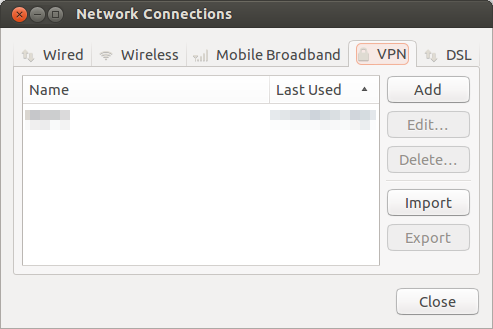
Then click the add button:

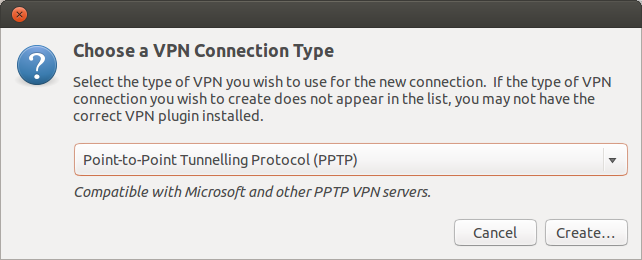
Select PPTP and click create:

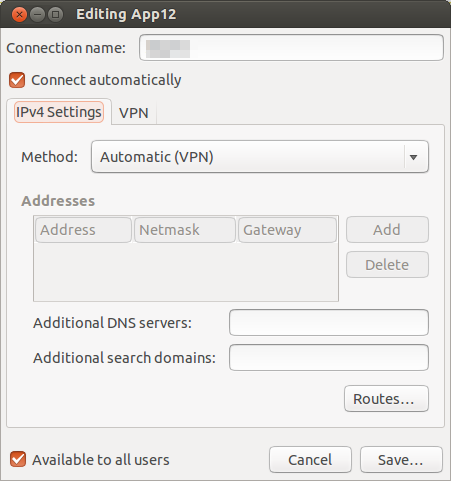
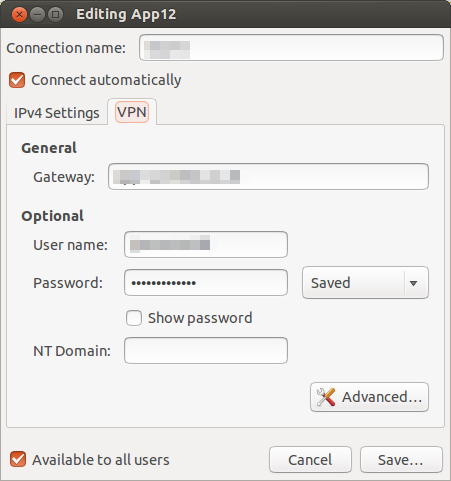
Don’t need to change the IPV4 settings – they should look like this:

You should name the connection, then enter the VPN server IP address or domain name. You will also need to add your username and password exactly the same as on the Synology server. Note: Don’t put anything in the NT Domain field. This isn’t required and will stop the client authenticating. Other how to suggest that you do this – it isn’t required for Synology.

Final Tweaks
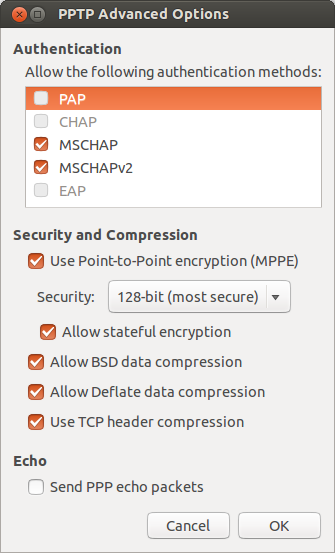
You can then tweak the advanced settings to make sure the client runs as securely as possible. Here are the settings that I used:

Enable Your VPN Connection
To enable your the VPN connection you should click on the Network Manager -> VPN Connections -> Select your VPN connection. You will know that the VPN connection is working when the network icon has a little padlock. You don’t need to reboot your computer to make this connection work.

If you have problems then I recommend tailing the /var/log/syslog to debug.

tail -f /var/log/syslog

I hope this helps. Let me know if you have any feedback.

How to route all your network traffic through an SSH Tunnel

I’ve recently been visiting China and have been caught out by their Firewall.  This hasn’t be too bad but Google Mail and Google Drive is really slow or intermittent.  Also you can’t access YouTube or the BBC IPlayer.   The final straw for me was for some reason they have blocked the Ubuntu Dropbox repository – so you can’t install Dropbox either.

I don’t have VPN account but we do have some servers.  Therefore, I decided to route all the network traffic through one of our server.

I tried various options and final settled on sshuttle because I needed to route everything and not just Firefox. Sshuttle is a transparent proxy server that forwards over a SSH connection and sets up a proxy by running Python scripts on the remote server.  I’m assuming your are running Ubuntu on both the client and the remote server.  You will need administrative privileges on the client.

sudo apt-get install sshuttle

To route all traffic through sshuttle (except DNS):

sshuttle -r username@sshserver:port 0/0

You will then need to enter your password on your client and then the password for the remote machine.  To help debug run sshuttle in verbose mode with the -v flag.  The -r flag is  the remote host (and username).   The port 0/0 is short for 0.0.0.0/0 that represents the subnets to route over the VPN.  The usage of 0/0 routes all the traffic except DNS requests to the remote server.  If you need to tunnel your DNS too then add the -H flag.

The project website is https://www.stunnel.org/index.html

Happy Tunnelling.

smbfs stops working after upgrading from ubuntu 12.04 to 12.10

Just has another little problem while upgrading from Ubuntu 12.04 to Ubuntu 12.10.  It seems that smbfs no longers works in Ubuntu 12.10.  Once again, why don’t the developers make a webpage or a popup application which tells you these changes?  It would save hours of time for lots of users.

Anyhow, here is how I converted my fstab to work.  Before it looked like this:

//server/share /mnt/server/share smbfs iocharset=utf8,credentials=/path/to/.smbcredentials,uid=1000,gid=1000

Afterwards, I changed smbfs -> cifs and remove the gid.

//server/share /mnt/server/share cifs iocharset=utf8,credentials=/path/to/.smbcredentials,uid=1000 0 0

If you have problems then tail the /var/log/kern.log

tail -f /var/log/kern.log

Great. Back up an running again.

Unity freezing after upgrade from Ubuntu 12.04 to 12.10

I just upgraded my desktop from Ubuntu 12.04 to 12.10.   Everything looked good until I tried to launch an application – then Unity frooze.  I thought it might be nvidia driver issues and tried:

apt-get remove nvidia-current;
apt-get install nvidia-current-updates;
reboot;

However, this didn’t fixed the problem.  After some searching around it appears that reseting Unity to default fixed the issue.  I wish the developers would make an upgrade script which checks that the Unity settings are okay (Firefox does this after an upgrade). Anyhow, here is how to reset Unity to its defaults.   You can either:

unity --reset

Or you can use this script which manages the process for you:  It is hosted on bitbucket at https://github.com/phanimahesh/unity-revamp  .  However, I installed it from the PPA:

sudo add-apt-repository ppa:amith/ubuntutools
sudo apt-get update
sudo apt-get install unity-reset
unity-reset

I used the script and it worked really well.  Hurray.