I usually make the hard drives on my virtual machines as small as possible to save disk space on the host. I do this because it is reasonably easy to resize them at a later date (especially if you using LVM). Anyhow here is a quick guide to resizing a qcow2 disk image.
1 – Shutdown the guest.. It’s important to shutdown the vm properly rather than pausing it or forcing it to a stop because you need the file system to be a perfect condition before resizing it.
virsh shutdown hostname
2 – Increase the qcow2 disk. It a simple command to increase the size of the disk. Here I am adding 5GB to an Ubuntu Server disk.
qemu-img resize ubuntu-server.qcow2 +5GB
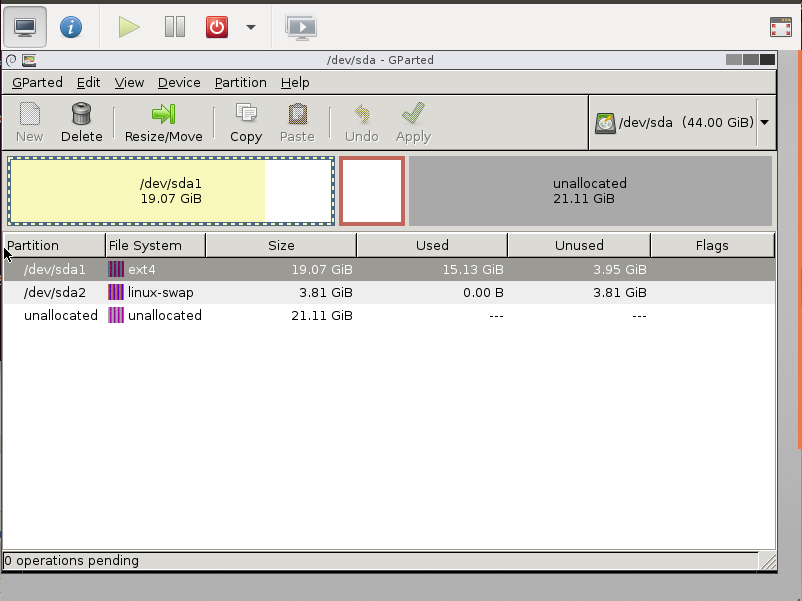
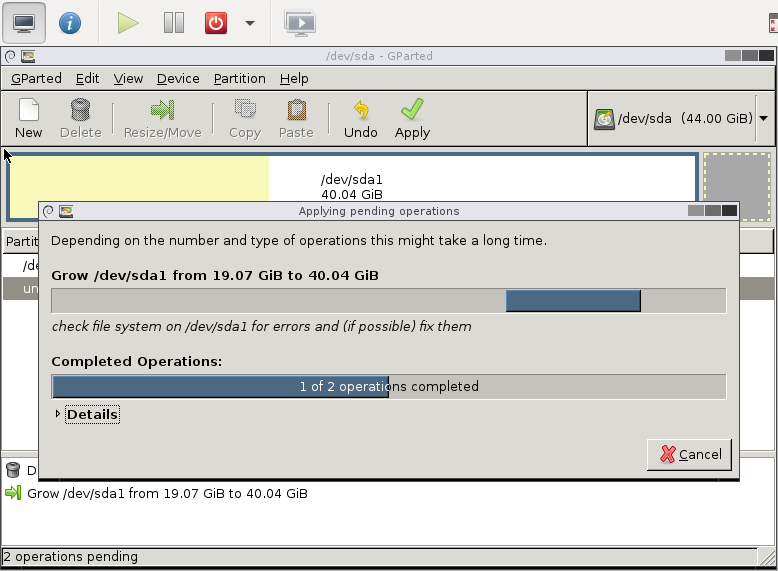
3 – Resize the partition Now that the virtual disk has been resized you need to resize the guest’s partitions within the image. I recommend using a small live Linux distrobution such as GParted Live. First download an iso image of GParted and attach it to the virtual machine by editing the vm settings.
virsh edit hostname
Add a boot order at the top. By default there will be one node that should read:
<boot dev='hd'/>
Simply change this to:
<boot dev='cdrom'/>
Add a cdrom after the hard disk. Make sure to change the /path/to/image.iso to the ISO image you want to boot from. If you don’t set this correctly the VM will not boot.
<disk type='file' device='cdrom'/>
<source file='/mnt/iso/gparted-live-0.16.1-1-i486.iso'/>
<target dev='hdc' bus='ide'/>
<readonly/>
</disk>
Finally, start the VM and VNC into it. I tend to use Virtual Machine Manager to connect to a VM. It works brilliantly on most Linux machines. You should then be able to use GParted to increase the size of the partition.
4 – Start the VM backup Note: Unless you really need it – I generally edit the VM and remove the cdrom and boot order by reversing the step described above.
virsh start hostname
Sometimes, instead of booting into a separate linux distro to resize the partition and the filesystem, I find it easier to boot into single user mode and do the operation using the already installed OS.
Edit the kernel command line, when grub starts, and append init=/bin/sh. You’ll be dropped into a shell, with the root filesystem mounted read-only. Now, use parted to edit the partition table, and resize2fs to extend the filesystem (if it is an ext2/3/4 filesystem). When done, issue a sync command, and forcefully reboot the virtual server.
Brilliant idea. That would save a lot of messing around with ISO’s. I’ll try an write a tutorial for doing this. Thanks.
If your disk is formatted with LVM, you can do most of this with the system online.
* Change the size of the partition -> Ideally this should be done un-mounted (off-line).
* Expand the LVM Physical Volume -> can be done while on-line.
* Expand the LVM Logical Volume -> can be done while on-line.
* Expand the filesystem -> can be done while on-line in 95% of cases.
Without LVM, using just a partition table and filesystems in partitions, it looks like this:
* Change the size of the partition -> Ideally this should be done un-mounted (off-line).
* Expand the filesystem -> can be done while on-line in 95% of cases.
“Edit the kernel command line” and append or remove what syntax?
Another idea: if you install your VMs using LVM inside the VM, then you can just do lvextend and online enlarging (at least with resize2fs).
This worked great! Thank you!
Next idea:
I often use in my VMs a Data Partition with entire device formated
eg:
/dev/vdaX -> OS -> / + SWAP
/dev/vdb -> DATA -> /srv
then you can do like this:
virsh shutdown ubuntu-server
qemu-img resize ubuntu-server-data.qcow2 +5GB
virsh start ubuntu-server
ssh -lroot ubuntu-server
resize2fs /dev/sdb
cu
chris
in this line: should omit the last / so will be like that: . Otherwise an Opening tag mismatch error will arise.
Hi, thanks for your comment. Which line are you referring to? James
should be
Just a quick note … I run rhel 7.3 as my host and, while I do have a 100Gb Xenial VM, it was my 30Gb Windows VM that was tight (boss gets very angry when his MS Office 13 docs get re-formatted by Libre Office or Open Office). Windows, it turns out has a disk utility where-by it was able to pick up the added space quite nicely.
Thanks. This article is helpful. 😉
Solve my question.
Hi, useful post, thanks!
however i got xml parsing error and needed to change xml as follows:
//no slash after ‘cdrom’ and remove readonly