System Error – Apport Reporting a Bug Ubuntu

Do you get lots of annoying crash reports on Ubuntu?.. well Apport is system tool which intercepts system crashes and reports them to Ubuntu. I’m sure that it is great for the developers – however it can be really annoying if you get the same error appearing all the time. So, you can easily disable Apport Error Reporting on Ubuntu by:

Step 1 – Stop Apport Service

sudo service apport stop

Step 2 – Remove apport

sudo apt-get remove apport 

Job done!

How to detect multiple dhcp servers on network using wireshark and Ubuntu

We just had a problem with our DHCP server and there seems to be another dhcp server on the network. To find this I used Wireshark on my Ubuntu machine to find the problem.

1 – Install wireshark

apt-get install wireshark

2 – Launch wireshark with permissions to read the network interfaces.
You can either do this by runnning Wireshark as root (which is really not recommended but a quick hack if you need to get the job done). Or you can give your user permission to read the interfaces which is much better in the longterm.

2.1 – To give your user permission to capture network interfaces do the following:

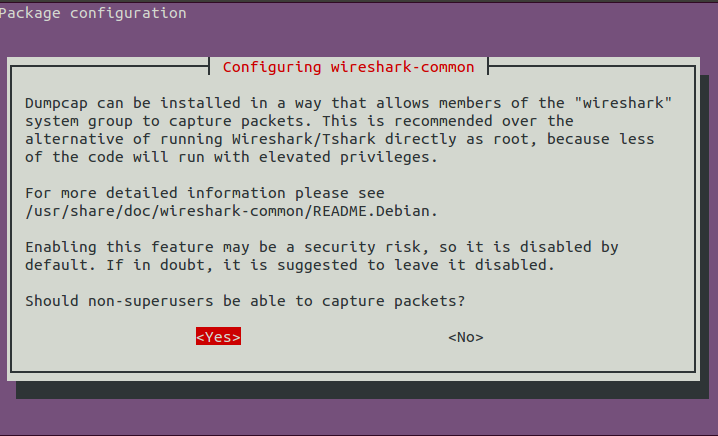
sudo dpkg-reconfigure wireshark-common

This will ask you the following question. Answer Yes.

giving_wireshark_permission_to_read_network_interfaces

This creates a group called wireshark and anyone in this group can capture network data on the interface.

2.2 – Add you user the wireshark group.

sudo adduser $USER wireshark

2.3 – Logout and log back in
For you group permissions to change – you need to log out and then log in again. Alternatively, you can just restart your computer.

3 – Start Capturing With Wireshark
Launch Wireshark either from your launcher or using terminal “wireshark”. On the start screen you should see a list of interfaces on the left hand side. Select the interface you would like to capture data from and press the start button.

The Wireshark Network Analyzer   [Wireshark 1.10.2  (SVN Rev 51934 from -trunk-1.10)]_010

4 – Filtering For “bootp” messages
You can then filter Wireshark just to show dhcp messages by filtering for bootp message but typing “bootp” and clicking apply.

Capturing from eth0    [Wireshark 1.10.2  (SVN Rev 51934 from -trunk-1.10)]_011

5 – Find all the offer packets
If you have multiple DHCP servers – you will have multiple offer packets. You can filter the messages by bringing up the packet details

click View -> Packet Details

This will show the packet details below the message list like so.

Capturing from eth0    [Wireshark 1.10.2  (SVN Rev 51934 from -trunk-1.10)]_012

You should then go into “Bootstrap Protocol” -> “Options: DHCP Message Type” and right click on “DHCP: Offer” and select “Apply As Filter”.

This will then filter all dhcp offers and you will be able to see what servers are responding on the system.

Great YouTube Video Tutorial
There is also a good wireshark dhcp tutorial on youtube which shows this in action. It is a Windows focused tutorial but explains the other general concepts really well.

I hope this helps someone. Let me know if you have any suggestions of how this tutorial can be improved.

Package ‘ia32-libs-gtk’ has no installation candidate Ubuntu 13.10

The package ‘ia32-libs-gtk’ has been removed in Ubuntu 13.10 (I have no idea why). When you try and install it you get the error “Package ‘ia32-libs-gtk’ has no installation candidate”. It seems that most people need this ia32-libs-gtk for installing or running Adobe Air. I have found the solution is:

sudo apt-get install libgtk2.0-0:i386 libnss3-1d:i386 libnspr4-0d:i386 lib32nss-mdns libxml2:i386 libxslt1.1:i386

This got Adobe Air working on my computer but it would be good to get feedback from other people – so please leave a comment if it works for you.

How to install Balsamiq Mockups on Ubuntu 13.10

I have made a new set of instructions for Installing Balsamiq Mockups on Ubuntu 13.10 because it it is slightly different from installing it on Ubuntu 13.04.

Step 1 – Download Adobe Airhttp://airdownload.adobe.com/air/lin/download/latest/AdobeAIRInstaller.bin.

wget http://airdownload.adobe.com/air/lin/download/latest/AdobeAIRInstaller.bin

Step 2: Make the installer excutable.

chmod +x AdobeAIRInstaller.bin

Step 3: Try running the installer.

sudo ./AdobeAIRInstaller.bin

Step 4: If your computer is 64bit then you will get this error:

"error while loading shared libraries: libgtk-x11-2.0.so.0: cannot open shared object file: No such file or directory"  

So, you will need to install the 32bit libs:

sudo apt-get install libgtk2.0-0:i386 libnss3-1d:i386 libnspr4-0d:i386 lib32nss-mdns libxml2:i386 libxslt1.1:i386

Step 5: Try running the installer again

sudo ./AdobeAIRInstaller.bin

Step 6: You might get this error:

Sorry, an error has occurred. Adobe AIR could not be installed. Install either Gnome Keyring or KDE KWallet before installing Adobe AIR.

To fix this run the following command:

locate libgnome-keyring.so

I got (but you might get something different).

/usr/lib/x86_64-linux-gnu/libgnome-keyring.so.0
/usr/lib/x86_64-linux-gnu/libgnome-keyring.so.0.2.0

You will need to pass reference to these libs when running the installer.

sudo LD_LIBRARY_PATH=/usr/lib/x86_64-linux-gnu ./AdobeAIRInstaller.bin

If this works for you then goto Step 7. If this doesn’t work then you could make symbolic links to the libs. For 64bit:

sudo ln -s /usr/lib/x86_64-linux-gnu/libgnome-keyring.so.0 /usr/lib/libgnome-keyring.so.0
sudo ln -s /usr/lib/x86_64-linux-gnu/libgnome-keyring.so.0.2.0 /usr/lib/libgnome-keyring.so.0.2.0

For 32 bit:

sudo ln -s /usr/lib/i386-linux-gnu/libgnome-keyring.so.0 /usr/lib/libgnome-keyring.so.0
sudo ln -s /usr/lib/i386-linux-gnu/libgnome-keyring.so.0.2.0 /usr/lib/libgnome-keyring.so.0.2.0

Finally – try running the installer again.

sudo ./AdobeAIRInstaller.bin

Then remove the symbolic links:

sudo rm /usr/lib/libgnome-keyring.so.0
sudo rm /usr/lib/libgnome-keyring.so.0.2.0

Step 7 – Download Balsamiq

wget http://builds.balsamiq.com/b/mockups-desktop/MockupsForDesktop64bit.deb

Step 8 – Install Balasmiq

sudo dpkg -i MockupsForDesktop64bit.deb

Step 9 – Make a cup of tea and some mockups
How to batch rename files in Ubuntu

You can batch rename files in Ubuntu using the “rename” command. It should be installed by default – so no need to apt-get install.

The command is quite simple:

rename s/"SEARCH"/"REPLACE"/g *

For example renaming:

google_marker_green.png
google_marker_blue.png
etc…

To:

map_marker_green.png
map_market_blue.png
etc…

rename s/"google"/"map"/g *

Hope this helps someone.

How keep multiple Ubuntu servers up to date

Once you have over three Ubuntu servers or desktops to manage it can be really useful to have a tool to help keep all their packages up to date. Put simply, you can’t keep logging into to each computer, checking and installing updates manually. I am not talking about configuring Ubuntu in the first place (you would do this is Ansible / Puppet etc). I’m just talking about installing periodic package upgrades.

For me the specific technical requirements of this tool would be:

  • The ability to see the state of all servers on one screen
  • Granular control to upgrade a single or multiple servers at once.
  • Granular control to upgrade a single or multiple or all packages at once

The general user / business requirements would be:

  • A simple easy to use piece of software with fast learning curve.
  • Good security protocols.
  • Good value for money.
  • Well maintained
  • Open source (optional)

I did some research, I found and tested following tools:

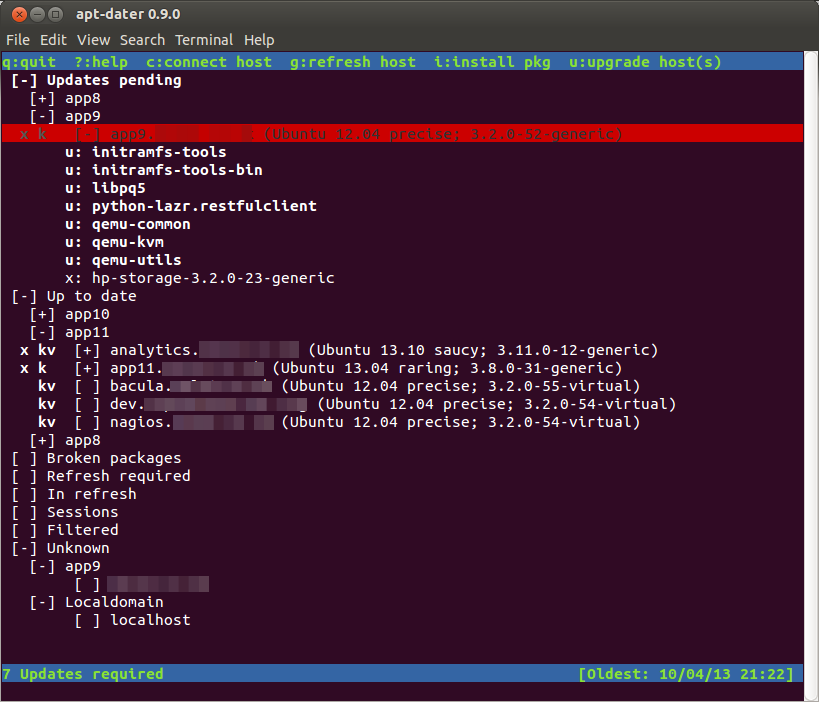
  • apt-dater – This is my preferred solution. Apt-Dater is an easy to use command line tool. The command line apperance is actually an advantage over a web based system because you can actually ssh into the computer directly from apt-dater itself. I.e. you can can see the packages being installed and then ssh in to fix any issues if they occur. It is very easy to configure.
  • using-apt-dater-to-kept-multiple-server-update

  • Ubuntu Landscape – This is a paid for, closed source, hosted service run by Cannonical and is design specifically for Ubuntu. It was the only tool I found with a web interface and coming with lots of additional features like monitoring. To test it, I signed up and used it for a year on two servers. It was really easy to use and met all my technical requirements. However it has one major problem… frankly it was poor value for money. The problem stems from the fact that you can only purchase the server management tools as part of a complete support package called Ubuntu Advantage. I generally don’t need support just the tools and a manual. However, when I tested the support they let me down. It was a lot slower and provided lower quality solutions than simply using a combination of Google and AskUbuntu. At the time of writing, it cost £201.68 per server. I have around 18 servers + 6 desktops and so if I rolled it out to all servers it would cost £4,015.24 per year. I normally think of IT investment over a 5 year period and would have spent over £20,000 in this time. This isn’t outragous for support but it is if you just want Landscape. Therefore, I could invest a little more time finding an alternative.
  • Puppet / Chef / Ansible etc – Using a server configuration tool might be another approach. You can configure these configuration tools to update the packages to the latest versions. However, once your server setup becomes more complex, it is impractical to completely automate the upgrading of packages. What if you don’t want MySQL upgrade as soon it hits the repositories? What happens if the kernel is upgraded? I feel it is a good idea to look at the upgrades before they are implemented and I don’t think that you can acheive this using these configuration tools.
  • cront-apt/apticron – Obviously, you could use a simple cron script to automatically upgrade the servers at say 3am every day. However, like configuration tools, I feel you need to look at the upgrades before they are implemented.

How to install Balsamiq Mockups on Ubuntu 13.04

You can install Balsamiq Mockup on Linux / Ubuntu but Balasmiq don’t provide good instructions. I have no idea why they don’t spend a little time and write documentation properly. Anyhow, here is how I installed Balsamiq on my Ubuntu 13.04 laptop.

If you are looking for Instructions for installing Balsamuq Mockups for Ubuntu 13.10 – please visit this post

Step 1 – Download Adobe Airhttp://airdownload.adobe.com/air/lin/download/latest/AdobeAIRInstaller.bin.

wget http://airdownload.adobe.com/air/lin/download/latest/AdobeAIRInstaller.bin

Step 2: Make the installer excutable.

chmod +x AdobeAIRInstaller.bin

Step 3: Try running the installer.

sudo ./AdobeAIRInstaller.bin

Step 4: If your computer is 64bit then you will get this error:

"error while loading shared libraries: libgtk-x11-2.0.so.0: cannot open shared object file: No such file or directory"  

So, you will need to install the 32bit libs:

sudo apt-get install ia32-libs-gtk

Step 5: Try running the installer again

sudo ./AdobeAIRInstaller.bin

Step 6: You might get this error:

Sorry, an error has occurred. Adobe AIR could not be installed. Install either Gnome Keyring or KDE KWallet before installing Adobe AIR.

To fix this run the following command:

locate libgnome-keyring.so

I got (but you might get something different).

/usr/lib/x86_64-linux-gnu/libgnome-keyring.so.0
/usr/lib/x86_64-linux-gnu/libgnome-keyring.so.0.2.0

You will need to pass reference to these libs when running the installer.

sudo LD_LIBRARY_PATH=/usr/lib/x86_64-linux-gnu ./AdobeAIRInstaller.bin

If this works for you then goto Step 7. If this doesn’t work then you could make symbolic links to the libs. For 64bit:

sudo ln -s /usr/lib/x86_64-linux-gnu/libgnome-keyring.so.0 /usr/lib/libgnome-keyring.so.0
sudo ln -s /usr/lib/x86_64-linux-gnu/libgnome-keyring.so.0.2.0 /usr/lib/libgnome-keyring.so.0.2.0

For 32 bit:

sudo ln -s /usr/lib/i386-linux-gnu/libgnome-keyring.so.0 /usr/lib/libgnome-keyring.so.0
sudo ln -s /usr/lib/i386-linux-gnu/libgnome-keyring.so.0.2.0 /usr/lib/libgnome-keyring.so.0.2.0

Finally – try running the installer again.

sudo ./AdobeAIRInstaller.bin

Then remove the symbolic links:

sudo rm /usr/lib/libgnome-keyring.so.0
sudo rm /usr/lib/libgnome-keyring.so.0.2.0

Step 7 – Download Balsamiq

wget http://builds.balsamiq.com/b/mockups-desktop/MockupsForDesktop64bit.deb

Step 8 – Install Balasmiq

sudo dpkg -i MockupsForDesktop64bit.deb

Step 9 – Make a cup of tea and some mockups